I love movement and I love celebrating, thus I always strive to create movement-rich celebrations. For years, I’ve done a movement advent calendar at the end of the year as a thank you to my readers, and as a way of inspiring people to move more in their daily lives. No fancy equipment, just us moving joyfully together during a busy time of year.
There are three ways to follow along this year. Starting December 1st, move along each day by following Nutritious Movement on Instagram or Facebook, or if you're not on social media or are trying to be there less (a decision we wholly support!) you can find each day's move below! If you're excited for more, check out the exercises from other advents here:
EXERCISE ADVENT 2014: Walking
EXERCISE ADVENT 2015: Upper Body
EXERCISE ADVENT 2016: Core Strength
EXERCISE ADVENT 2017: You DO Know Squat
EXERCISE ADVENT 2018: Get Heavy
EXERCISE ADVENT 2019: Dynamic Home Advent-ure
EXERCISE ADVENT 2021: Take A Breather
EXERCISE ADVENT 2022: A BUTT For The Holidays
Exercise Advent, Day 1: “Twist Proof Ankles” Calf Elevators
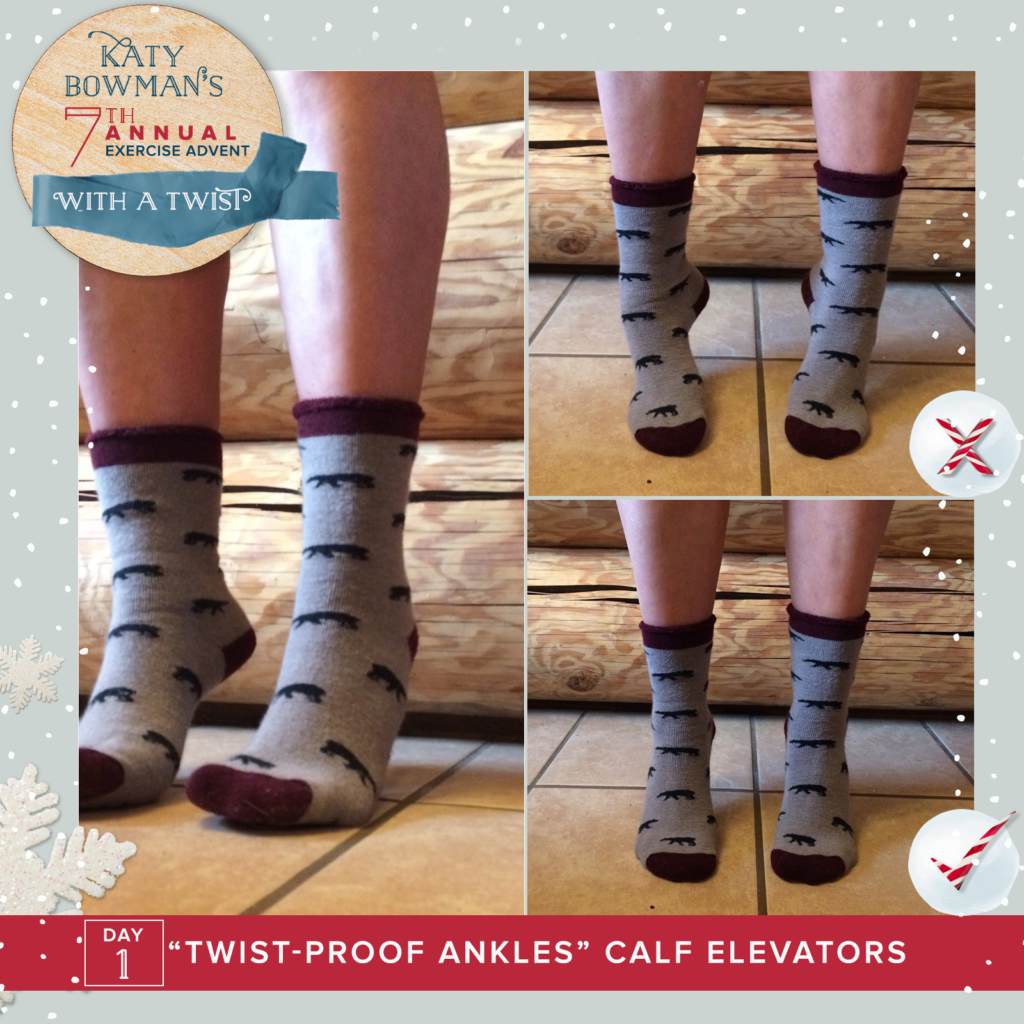
Ankles, like elevators, should be able to move the body straight up and down without traveling side to side or rotating as they do so. Many have done calf raises before, but calf elevators are different—the form of this move (stable ankles) is what makes sure you’re not strengthening any wobbly ankle movement, if that makes sense. Nice thing about this move is it is designed to translate to walking. Strengthen your ankle stabilizing skills in a focused exercise and then take your newfound plantarflexing strength and stability TO GO.
1. Stand with feet forward, ankles pelvis-width apart.
2. Slowly lift and lower the heels keeping your ankles centered (don’t let them drop outward or inward or twist) and moving straight up and down.
Don’t overly thrust the pelvis to help you get up and toes should be lift-able throughout the entire exercise (weight is on the front of the FOOT, not the toes). How many times can you do this, slowly and with joint stability, before getting tired?
P.S. Days 1-5 are going to put your legs through a few purposeful twists and turns that work together as a group of moves and will help with your gait. Make sure to try them as a set!
Exercise Advent, Day 2: Calf Stretch With A Twist
Raise your hand if you know the Calf Stretch. Ready for a twist? Your body is a master at moving despite areas that can’t; it simply twists immobile parts out of the way. Your calf muscles have to lengthen in order to dorsiflex (front of the foot closer to a neutral shin), but when they can’t, your entire leg will rotate internally, moving the calf muscles out of the way, so you can bring your foot closer—only now it’s to a rotated shin.
This move will have you untwisting your leg and HOLD IT straight while doing a Calf Stretch to get a more accurate read on how your calf muscles can move (or not).
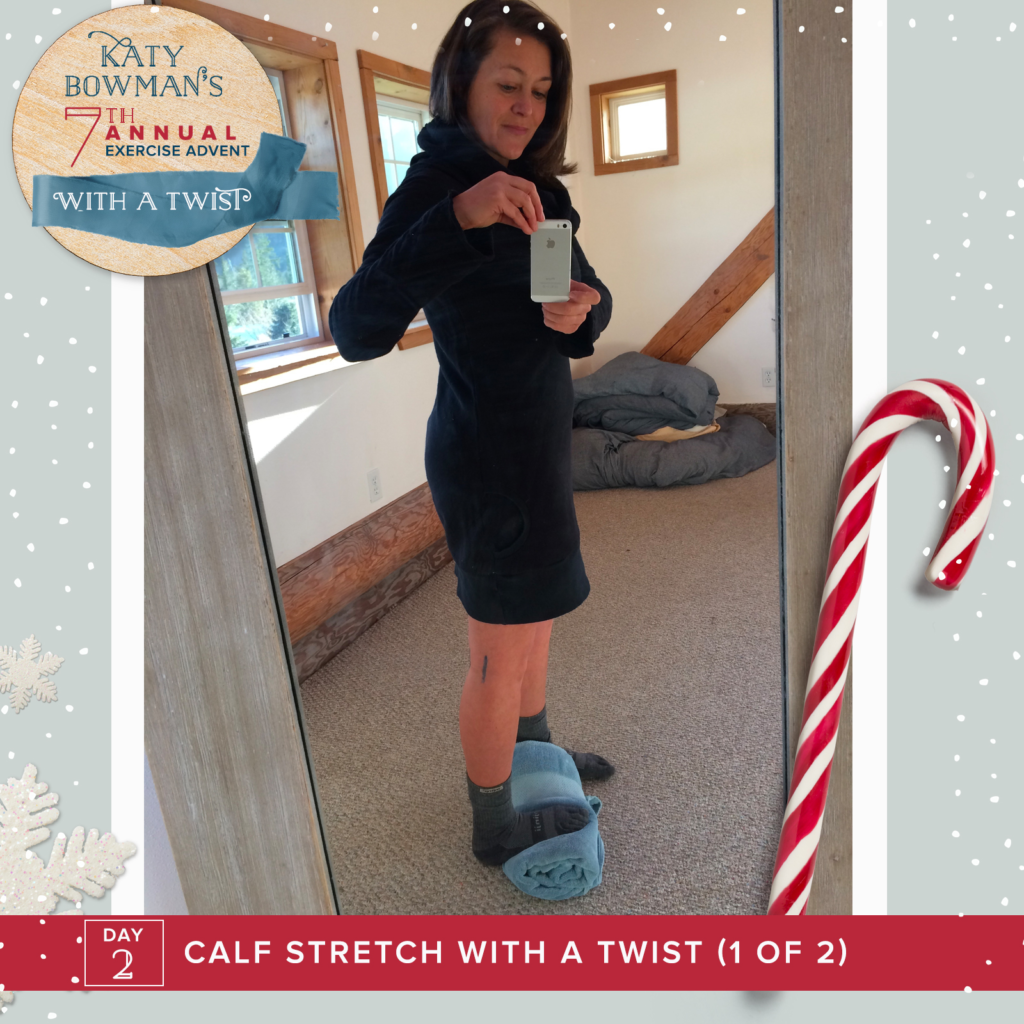
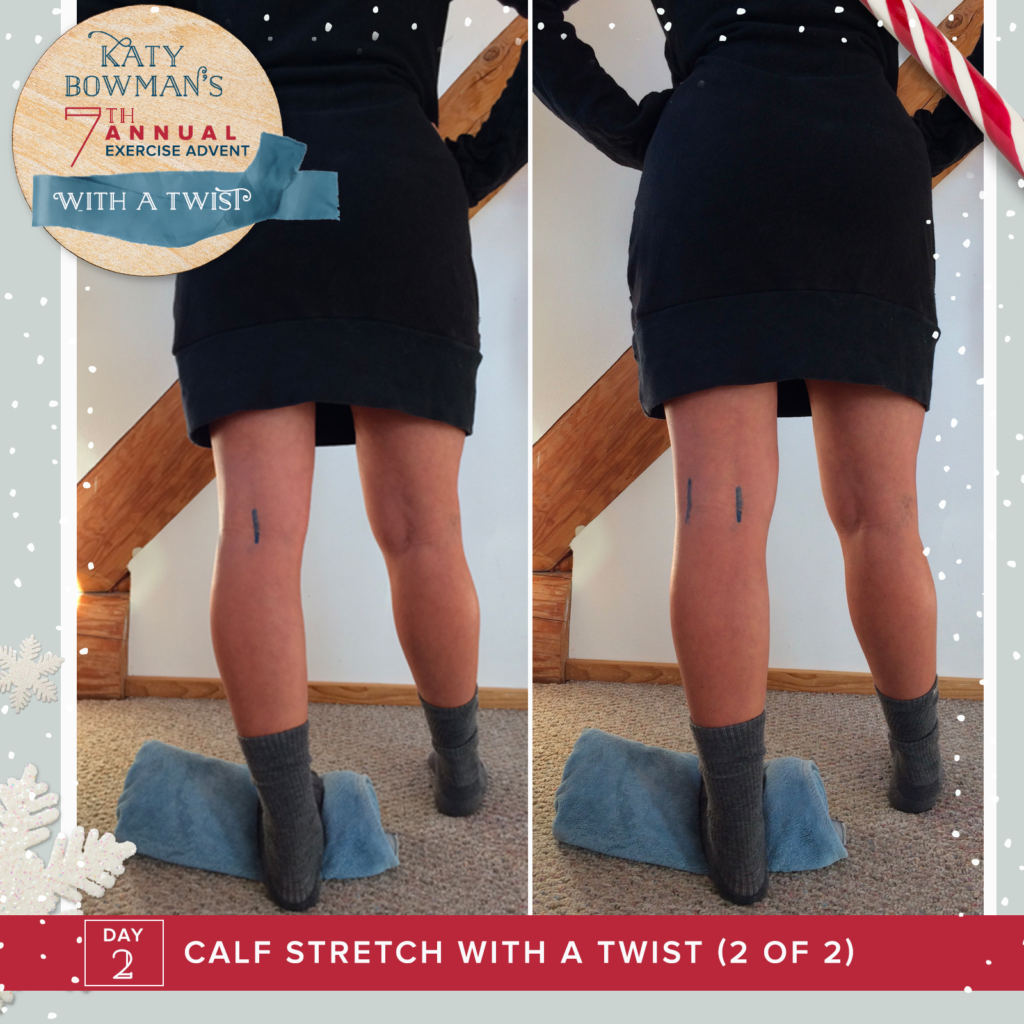
1. Start with a regular Calf Stretch. Place the ball of your left foot on rolled-up folded towel or dome, drop the heel all the way to the ground, and straighten that knee. Step forward with the opposite leg as much as you can, keeping your torso upright (PIC 1, above). Do both sides, holding 30-60 sec.
Now, we’re going to put the muscles in the right place and see what happens.
2. Put your foot back on the towel and then turn that knee-pit so it points straight back behind you (pic 2, right) and not to the side (pic 2, left); most will have to rotate the thigh externally to center it and the ball of the foot might need to lift from the floor.
3. Holding your knee-pit in place, step forward with the opposite foot as much as your calf muscles comfortably allow. How does the calf stretch feel now that you’ve put your calves in line with it?
Fun fact: If you have a tendency towards ankle “over/hyper-pronation”, check out your calf tension. When moves like “calf stretches” are done without good form, you might be missing that the calf muscles aren't moving much at all; their tension can be what’s displacing your ankle into a hyper-pronated position. Gotta check the knee pits, yo! You can’t really see what the ankles are actually doing without taking them into consideration.
Exercise Advent, Day 3: Inversion, Eversion Ankle Twist
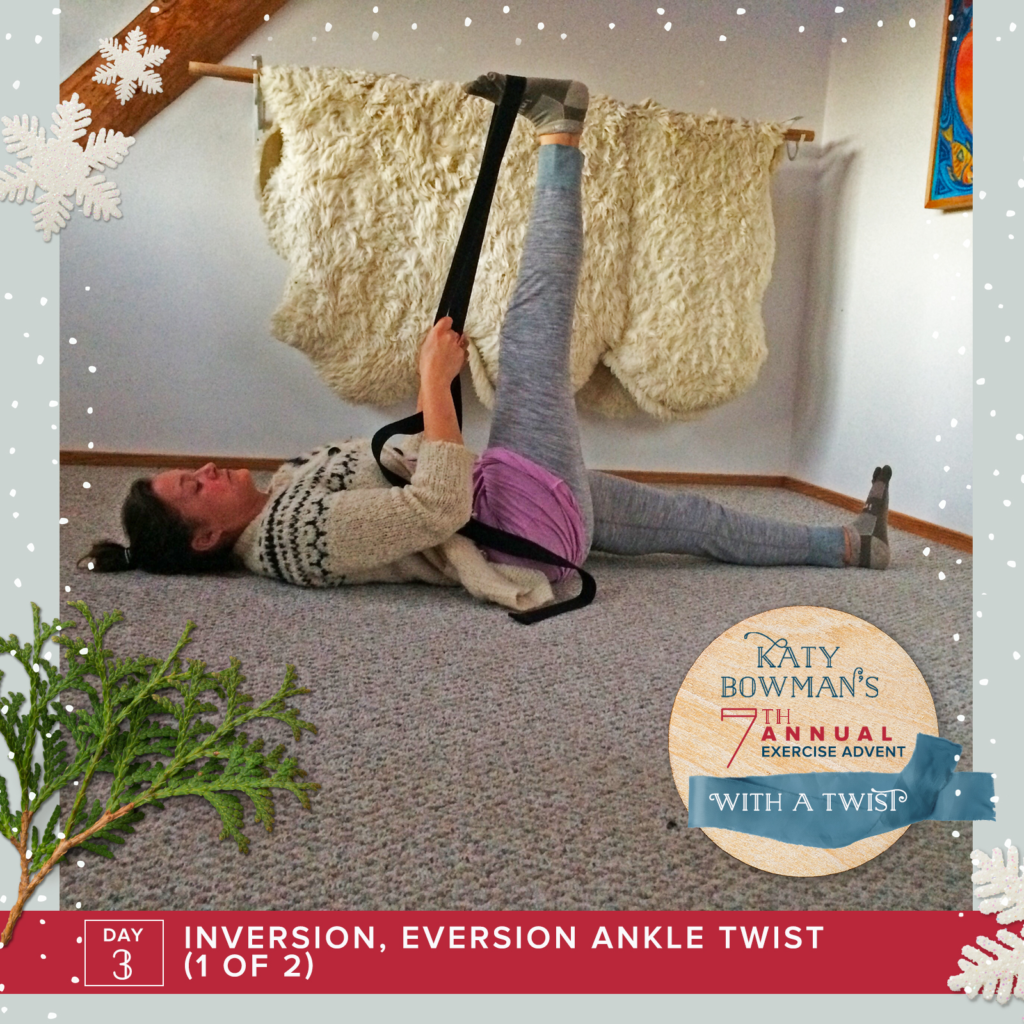
Who wants more ankle love? This move pairs with our Strap Stretch (pic 1) so you’re not only moving the back of the legs, you’re also seeing how these areas tend to clump together and might leave you thinking you have an “overpronation” issue when really it’s about how these parts are able to move (or not move) relative to each other.
1. Get into a Strap Stretch. Right leg up, left leg down, both legs straight.
2. Wrap a strap (or belt) around the front of the right foot, and keeping that knee straight, pull the front of the foot toward you to stretch the back of the leg. P.S. This is a great move you can do on its own.
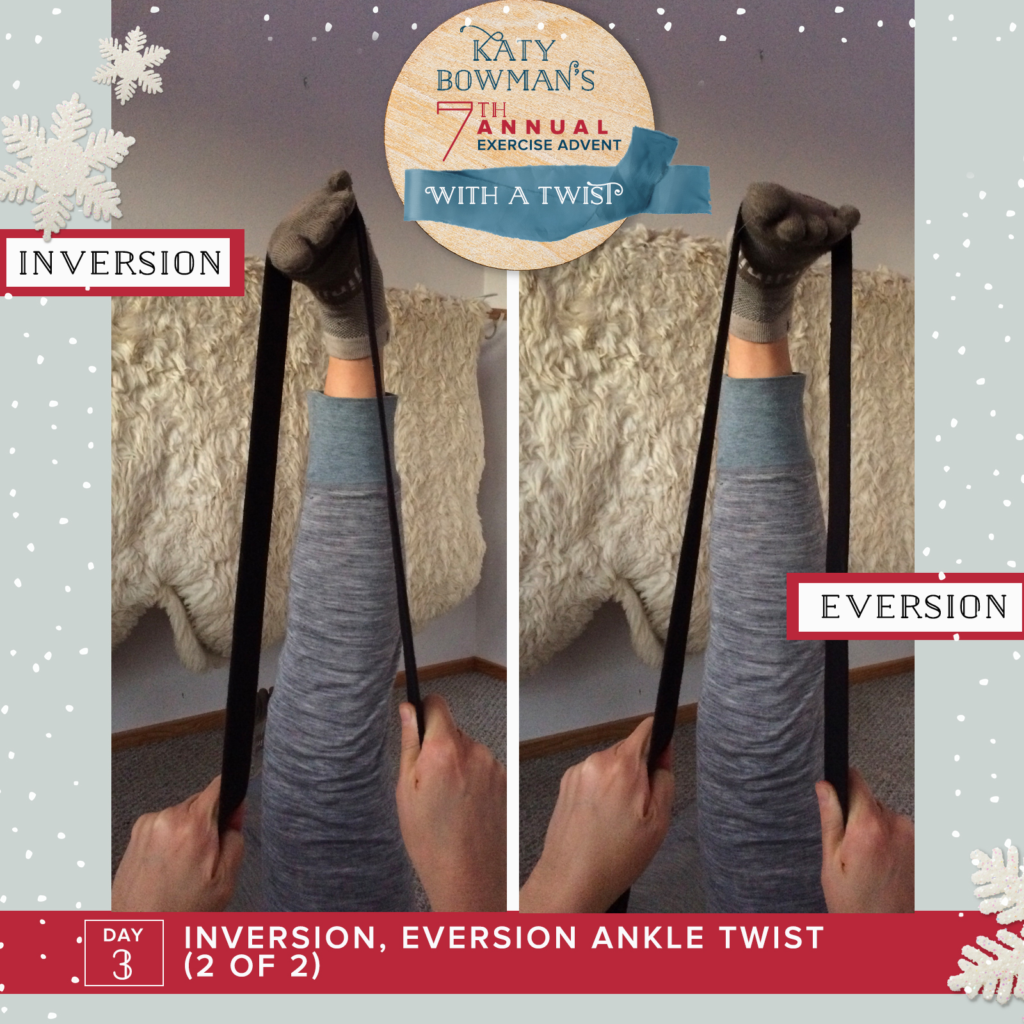
3. Keeping your Strap Stretch form, start to move the foot at the ankle by reaching the outside edge of the foot up (inversion) toward the ceiling, then by moving the inside edge of the foot up (eversion). Do this 20 times each side.
IMPORTANT: Notice if your thigh is twisting in order to move at the ankle. Those parts don’t need to be clumped together; if they are, you’ve got a weak hip/weak ankle relationship. If this is the case, focus on keeping the thigh still (use the kneecap as your marker) as you do the ankle movements in Step 3. THEN you’ll not only be moving the ankles better, you’re strengthening your hips relative to them. Can’t get on the floor? You can do this in bed or sitting in a chair with your leg on a stool or ottoman in front of you. Try it 20 more times!
 Exercise Advent, Day 4: Shank Twist
WHO IS FOLLOWING ALONG? Today’s move is small, but important. When we make a list of “knee motions,” they’re usually limited to BENDING and STRAIGHTENING, but they also TWIST. That’s right, friends, your lower leg rotates relative to the thigh bone (and also the other way around).
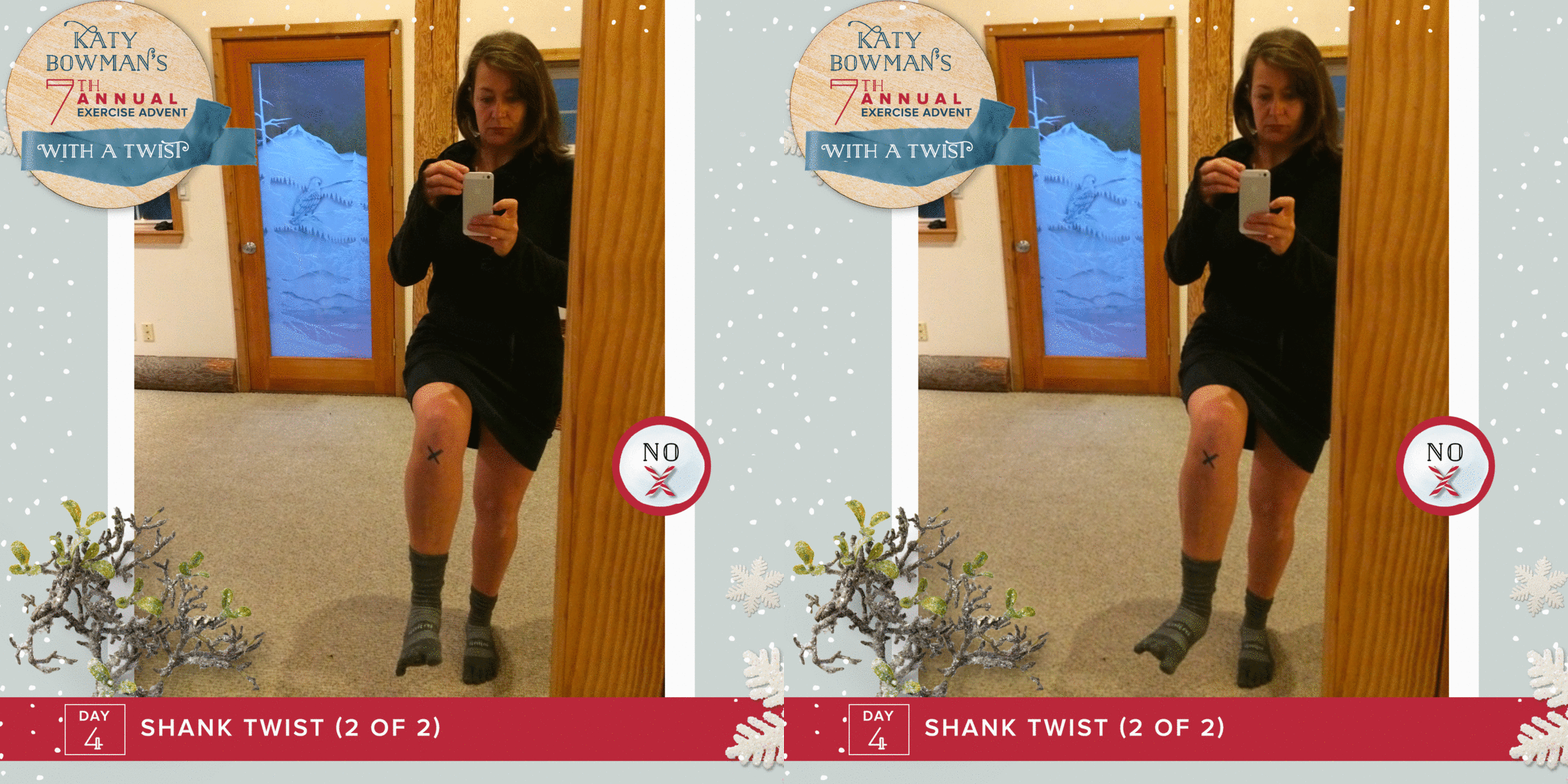
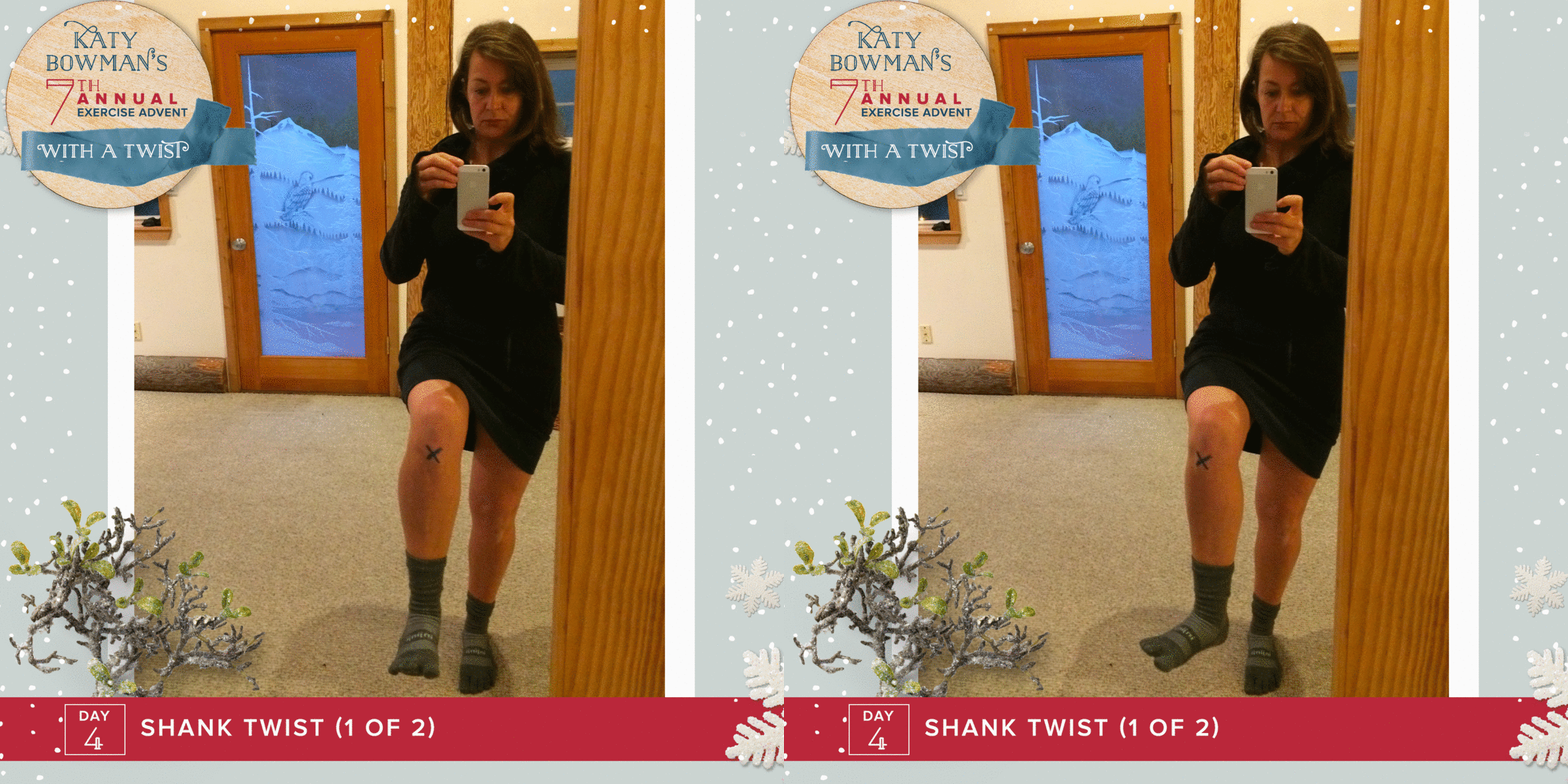
1. Start seated with knees bent (I’m standing here, but it’s easier to learn seated). Try to turn your shin bones so that your foot points more outward, and then turn the shin back in towards the midline. I’ve drawn an X on my leg so you can see how it changes position. (Pic 1, above).
2. Make sure the outward/inward foot movement isn’t coming from the ankles (as shown in Pic 2). Inversion and eversion of the ankle (see day 3 for more on that) can mask untwisting knees but this is ANKLE MOTION standing in for KNEE MOTION. It’s also why the position of the foot doesn’t tell you anything specific about the hip, knee, or ankle positioning. The foot can turn in or out in a variety of ways (and so can the knees, for that matter).
Some tips:
1. Manually twisting your shin with your hands can be a helpful tactile cue.
2. Lower leg anatomy doesn’t turn in as much as it can turn out.
3. When you've been using your leg in a particular way, muscle can build up and stiffen the leg. Lower-leg self-massage (along the outside of the shin) can help. Give this one time!
Exercise Advent, Day 5: Forefoot Twist
So now you know that the position and movement of your thigh bones affect the position and movements of your knees and ankles and vice versa.
Today’s move is the missing (strength/exercise) link to many issues of the feet, knees, and hips: it’s the ability of the front of the foot (forefoot) to rotate relative to the rear foot. This movement isn’t described or named in any anatomy books I’ve ever found; in Whole Body Barefoot I named it forefoot eversion (anatomy and podiatry geeks will know why). Forefoot eversion is a small and mighty move, so here’s how to do it.
1. Stand with your feet pointed straight ahead, legs straight and vertical.
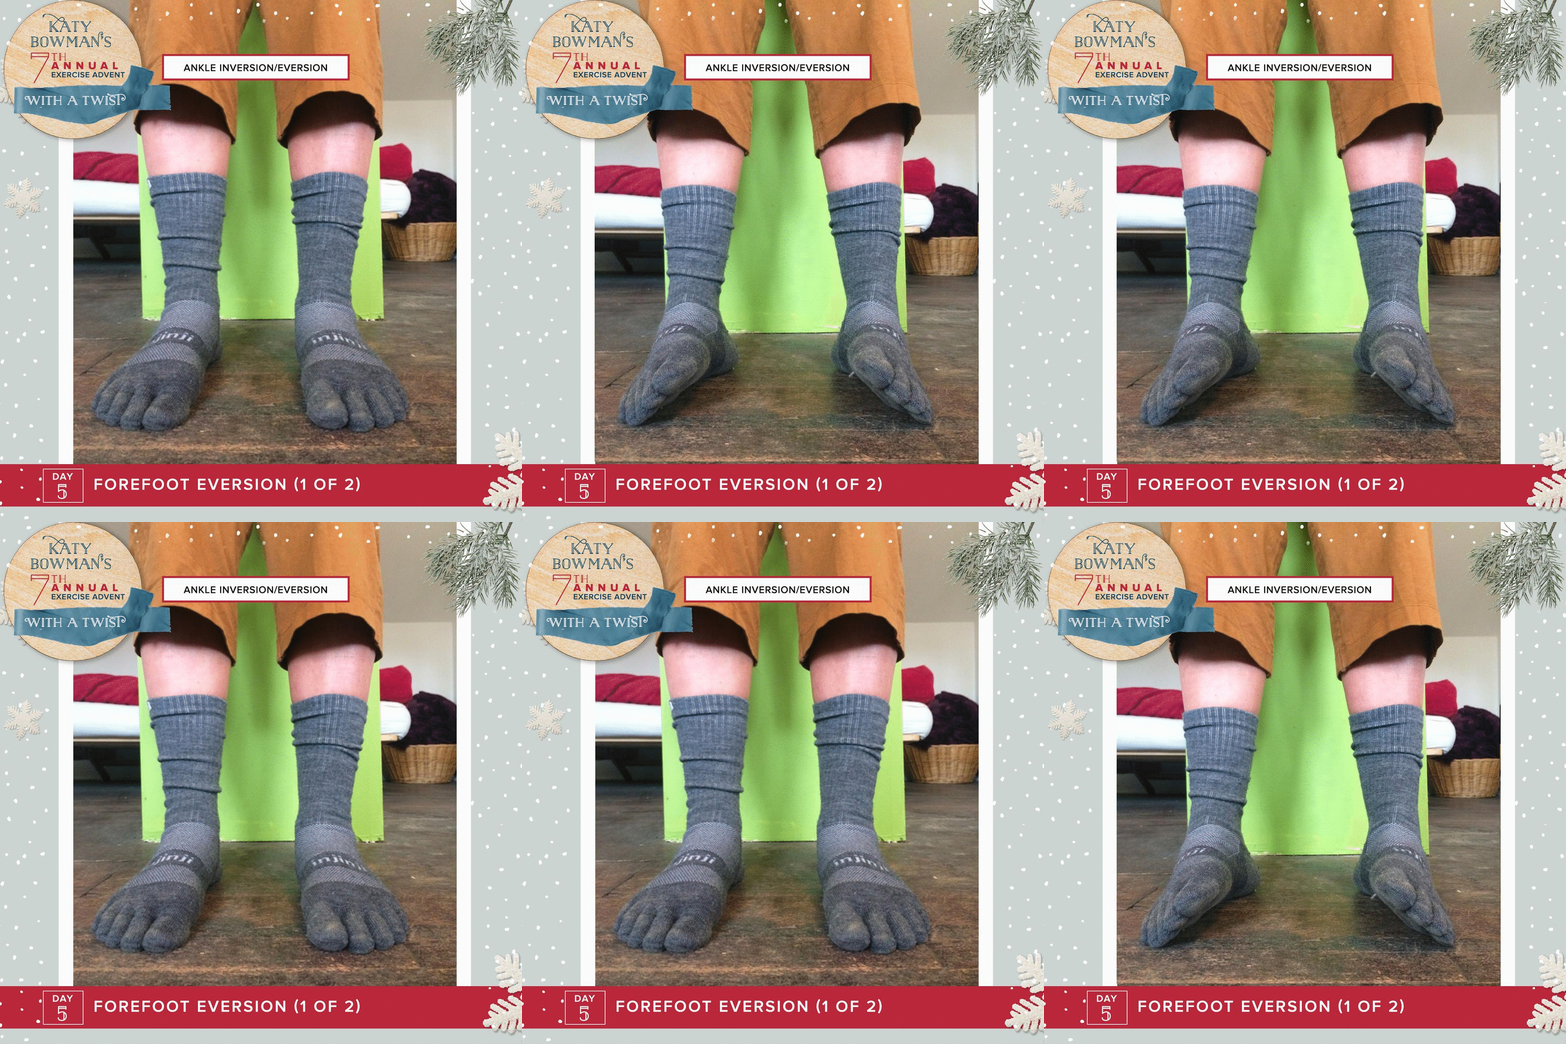
2. First, rotate your thighs outward to align your knee-pits (see Day 2's exercise) and then back inward, watching how this also lifts and lowers the inner edges of your feet as well as moves the ankle back and forth. You’ll likely see the entire foot moves as a stiff board, up and down. This is ANKLE inversion and eversion. This is shown in Pic 1 above.
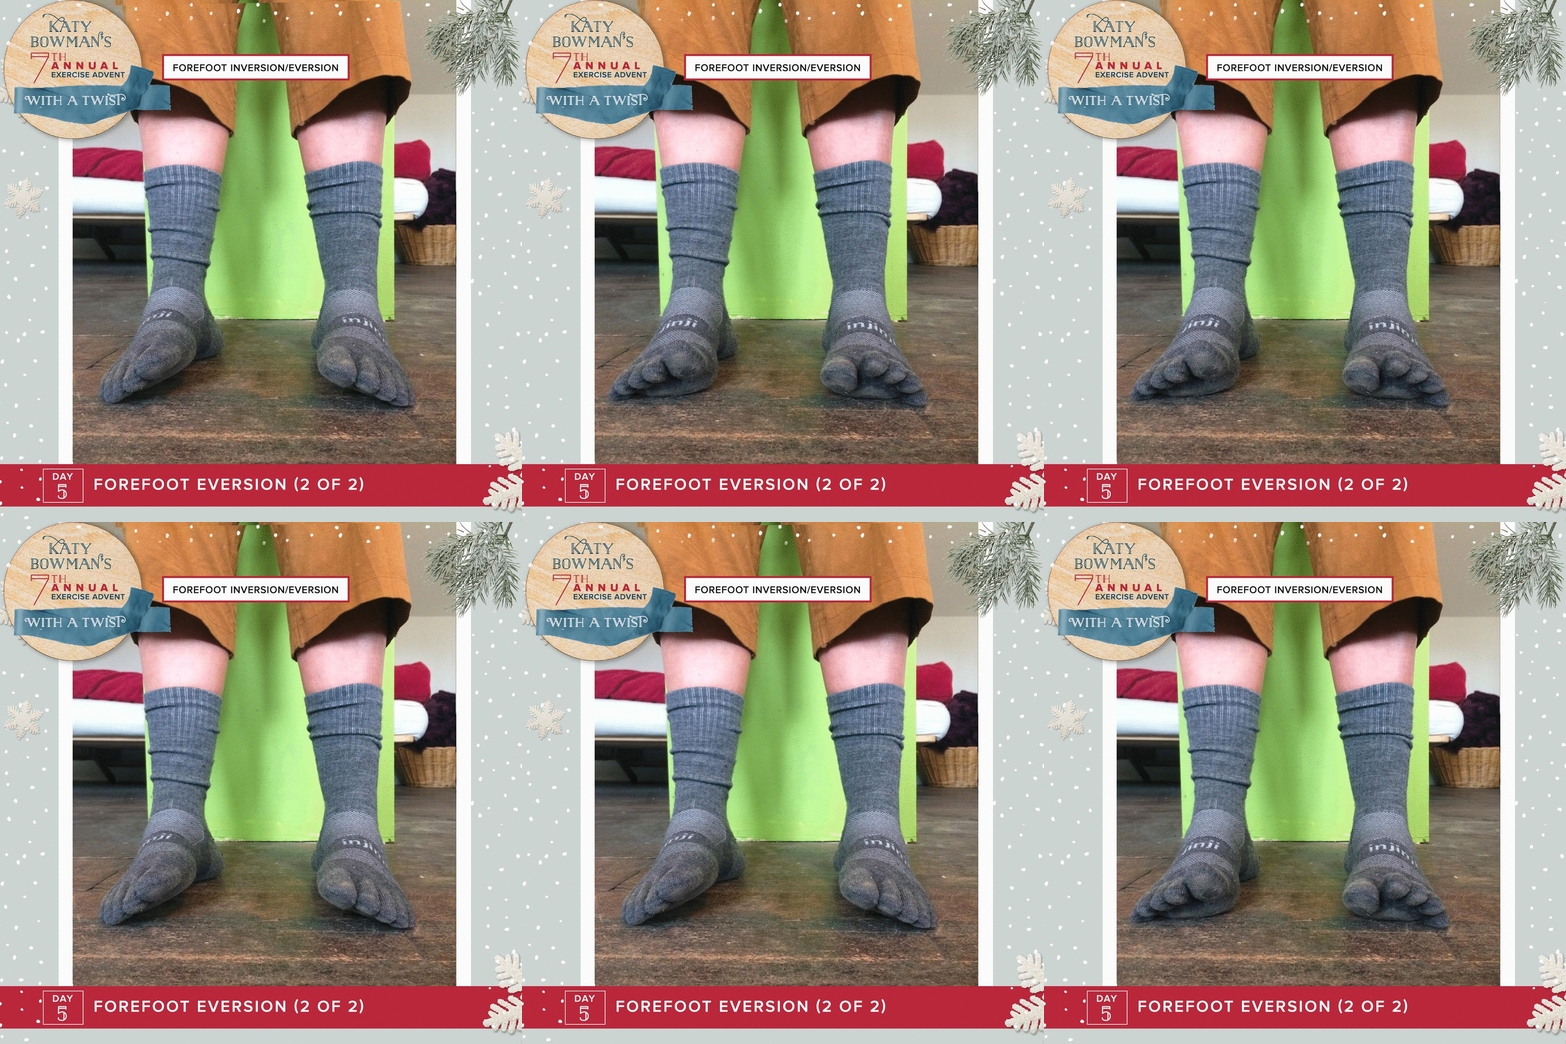
3. Now align your knee-pits behind you and keeping them and your ankles in place—stability!—work the muscles inside the foot to bring only the ball of the foot down to the floor—the arch and ankle don't come down too . This is today’s twist!
No more pancake feet, your ankles can stay upright, your knees in front and behind you, and the entire front of the foot is there to support you. This is an essential movement for strong ankles, dynamic feet, and stable knees and hips. It is not easy and cramping (found some new muscles, did you?!) is common. It can take a long time to move the front of the foot by itself, so you're really just reaching the ball of the foot toward the ground. If it makes it, great, if not, keep at it.
Take a break to do the Top of The Foot Stretch if you know it, massage and twist the forefoot with your hands, and try again (and again and again).#exerciseadvent #wholebodybarefoot #walkingwell #moveyourdna #alignmentmatters #amisupposedtowalkaroundlikethis? ←- Not yet. It takes a while, just practice the strength and mobility as exercises for now.
Exercise Advent, Day 6: Nothing Funny About This Humerus Twist
We’re moving on up, friends—to the upper body—and starting with something simple. Can you rotate your shoulders? That seems easy, but is it?
Just as you can move the ankle a lot and think it’s the hip (see Days 1-5), you can flip your hand forward and back and not move your shoulders much at all. Here’s an exercise in telling the difference.
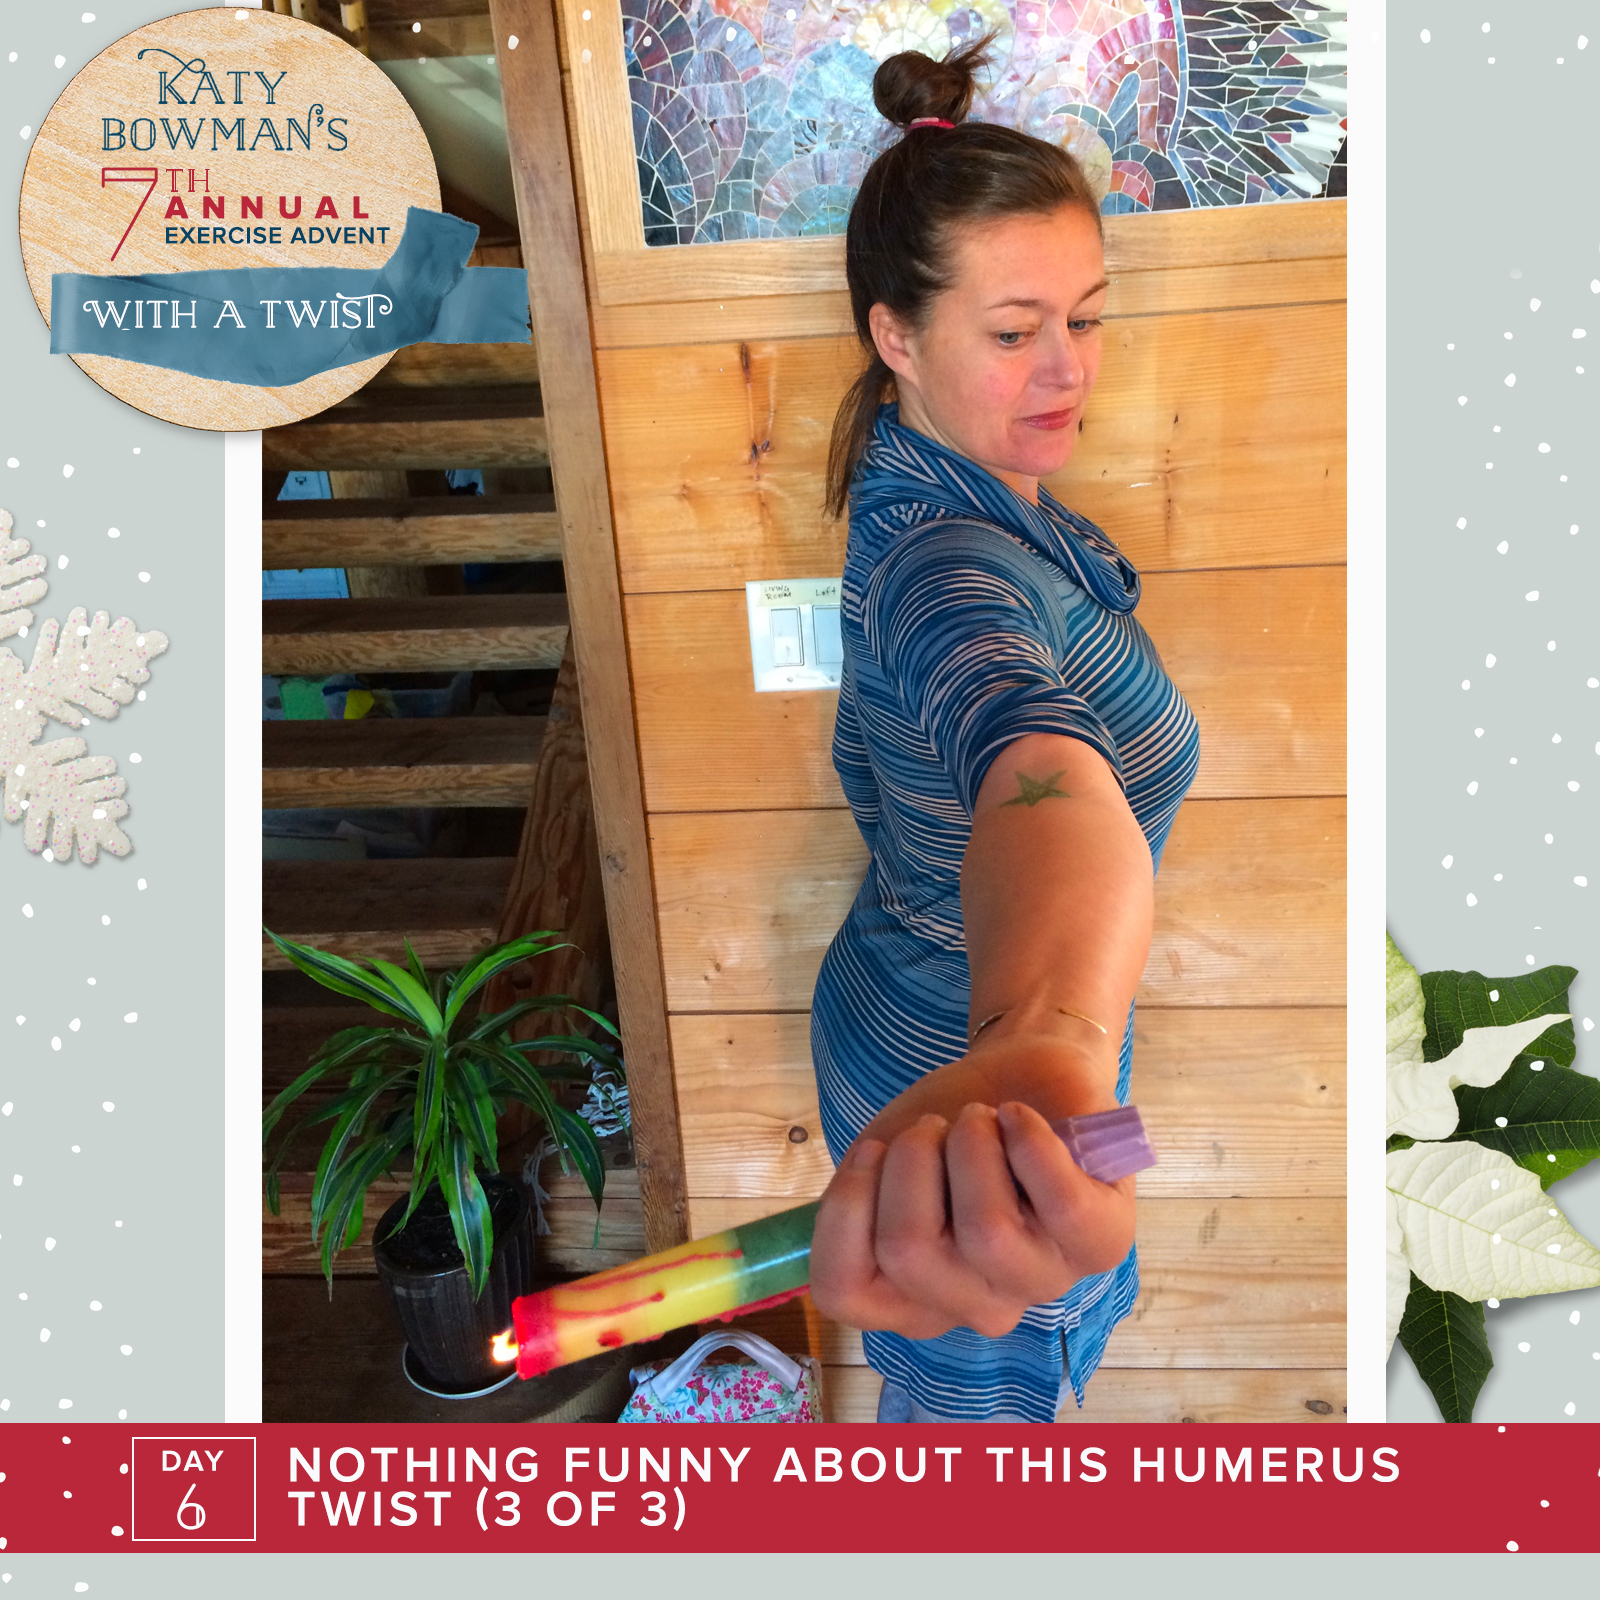
1.You’ll need something to grasp—pen, pencil, candle, hammer, etc. (Pic 1)
2. Reach your arm out (in front or to the side) and with a slight bend in the elbow, start turning your down and back up. Where are you rotating from? There are two possibilities: one is at the elbow (pronation/supination) and one is at the shoulder (internal/external rotation).
3. How to tell? WATCH YOUR ELBOW PITS! (Pic 2) See my star? When the star doesn’t move but the hand is turning back and forth, that’s lower arm/elbow movement. Today’s twist is to TURN THE STAR WITH THE CANDLE. That’s the more challenging, often missing shoulder movement.
4. Once you’ve figured out how to stabilize the elbow and turn from the shoulder, add a fuller rotation by also turning your item backward, keeping the star with you (Pic 3). Watch the ribcage on this one. It should stay down and in place and not lift (back arch) as you try to rotate the item back. Chest lifting and lowering is another way to turn the star without turning the shoulder (sneaky move!). Note: Our arms don’t turn as far back as they do forward.
Once you have figured how to turn from the shoulder, turn your arms while they’re straight out to the side, while they’re slightly behind you, with them reaching forward, and try some of the angles in between.
Relative to their capacity for movement, our shoulders might be the least moved part of our bodies at this point. The upper arm bones are the connection points for many parts vital to breathing, chest movements, sacrum stabilization, and upper body strength. This move is a gift you might not have known you needed (and you’ll be calling on it for the rest of this series!)
Exercise Advent, Day 7: The Don’t Let Me Twist Your Arm! Twist
When it comes to the body, “it’s all connected.” We say this a lot and I agree but I also like to note that sometimes the body gets TOO connected. (See: STICKY SPOTS ←- Read Move Your DNA for more on that.) Today’s move checks the connection between our hand/lower arm and shoulder.
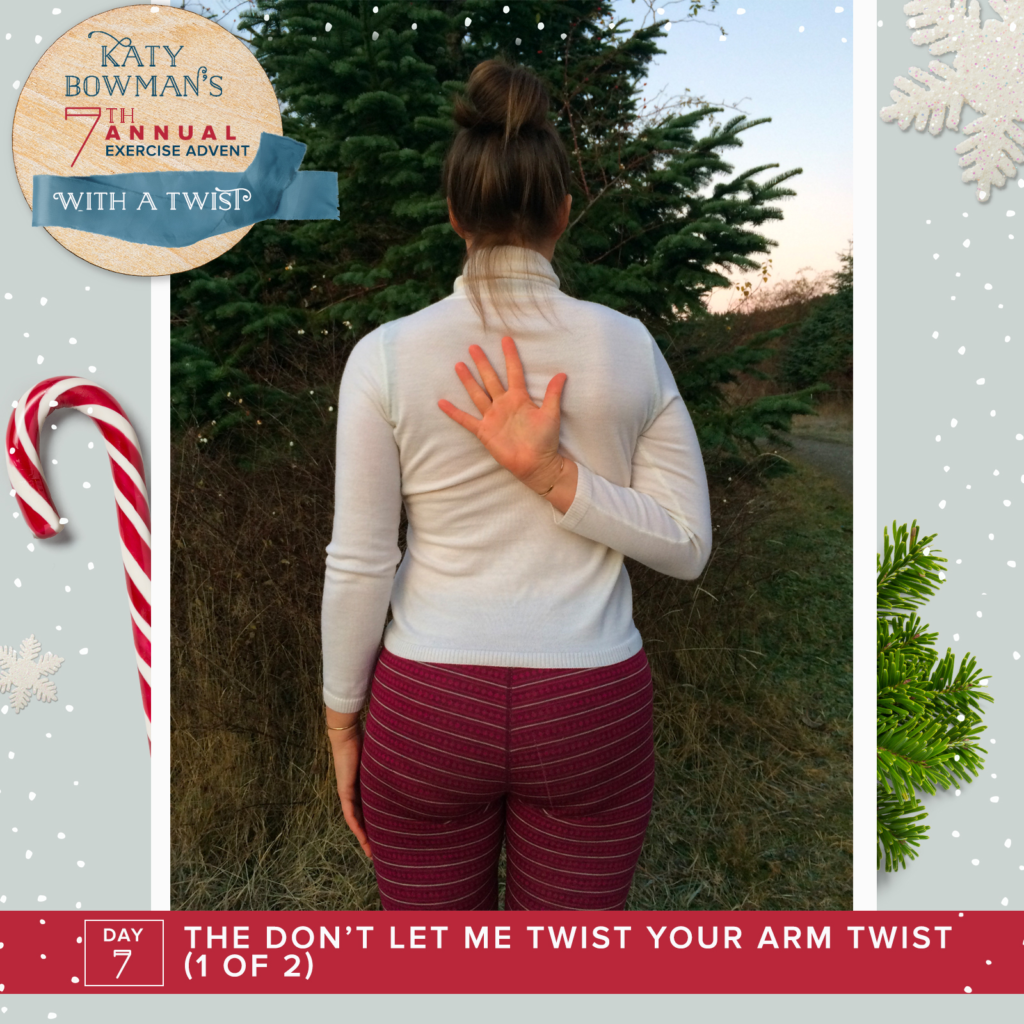
1.Reach your right arm behind your back and bend it to bring the back of the hand to the spine as in Pic 1 (if you can’t bend it, just let it be straight across).
Alignment checks here: pelvis back, ribs down, head ramped (you can find all of these explained on my blog). If this part is already really pulling on your shoulder, then make it today’s exercise.
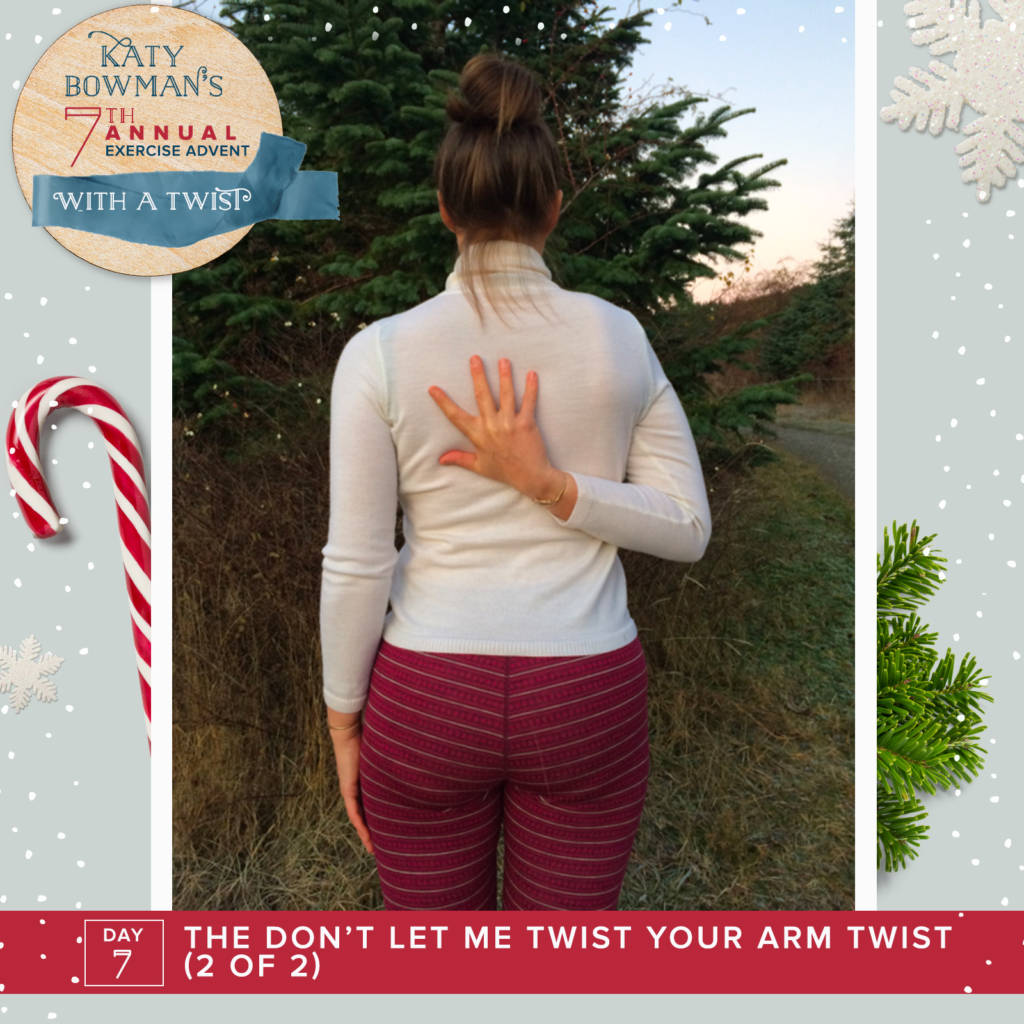
2. ARE YOU READY? Now you’re going to FLIP YOUR HAND SLOWLY until the palm rests on your back. There’s only one direction it can turn (supination; lift the pinkie side to do the turn). If it’s not turning, try turning the other way. If it’s not turning because your shoulder is protesting, then you’ve found a place in the body that’s too connected! If you can partially turn, do that, and then practice more often. You can also pair this with upcoming advent upper body moves to make this area more mobile.
Alignment checks: When you flip your right hand, notice if that makes your entire right shoulder blade jut. If yes, unflip, use your left hand over the top of your shoulder to help make that shoulder blade lay flat (pull it wide) and then try flipping that hand again without letting the shoulder blade move. The shoulder BLADE moving is a sneaky way to keep the shoulder JOINT from moving).
Exercise Advent, Day 8: Thoracic Stretch With A Twist
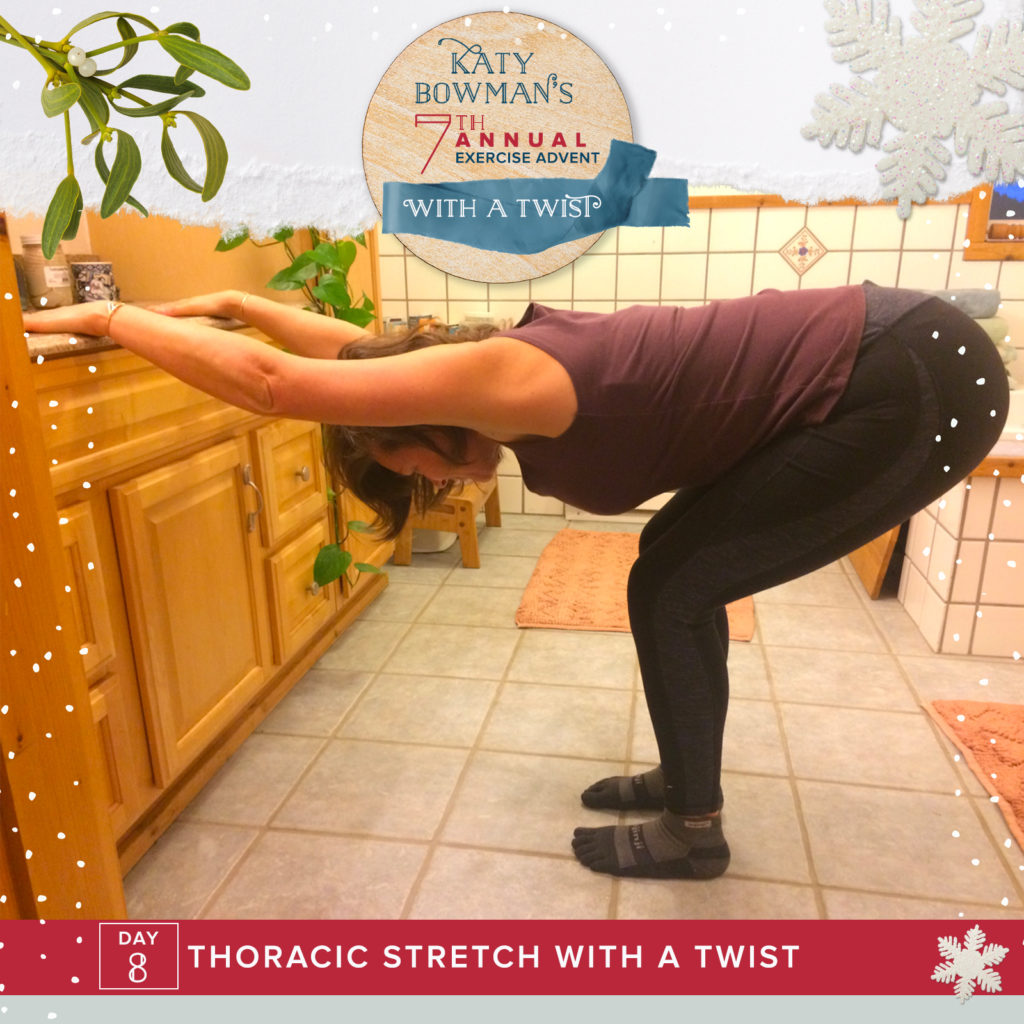
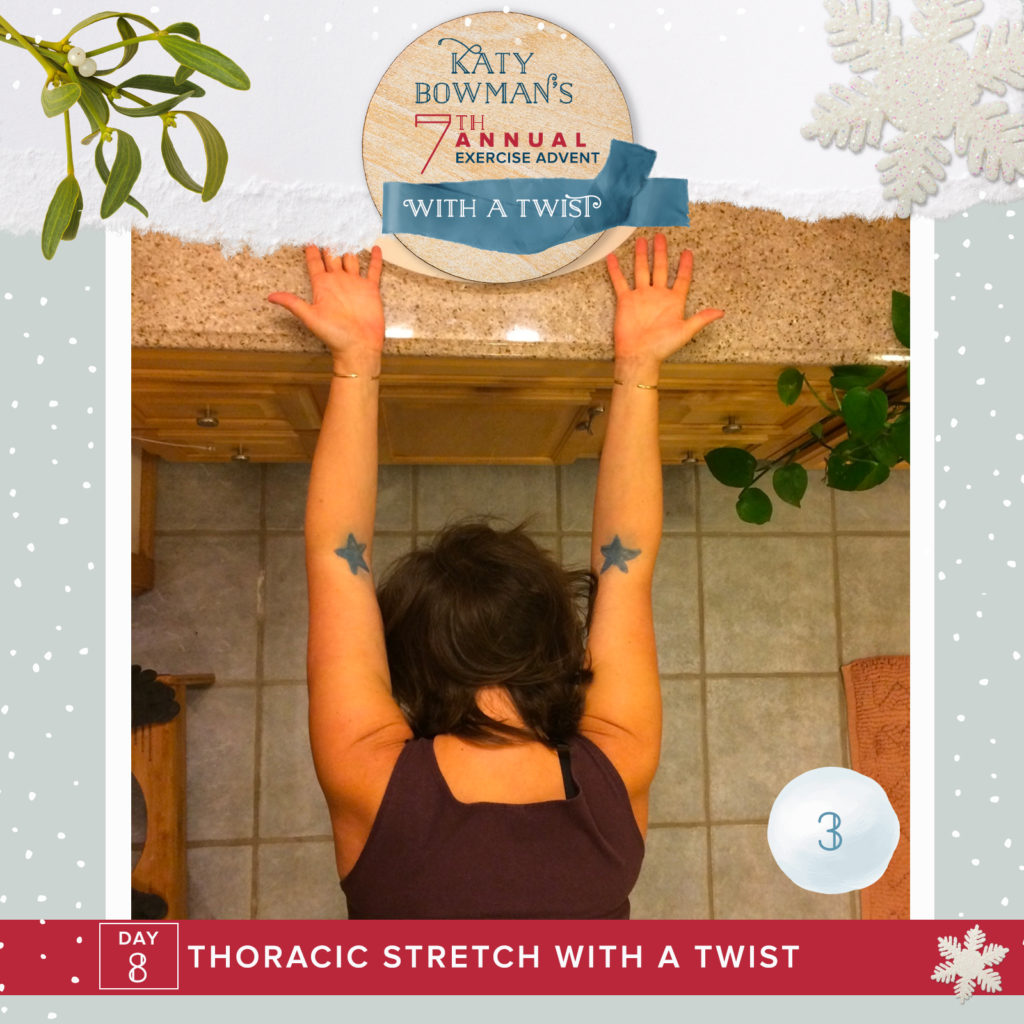
Thoracic Stretch is one of our vintage moves, but here’s the twist: you’re going to move your STARS (your elbow pits) to see how that changes things. I’m also taking the lower body out of it so you can focus on the upper.
1. Place your hands on a counter and walk back so your torso can drop toward the floor. Bend your knees so tight hamstrings don’t pull on the upper body. How does this feel on your shoulders?
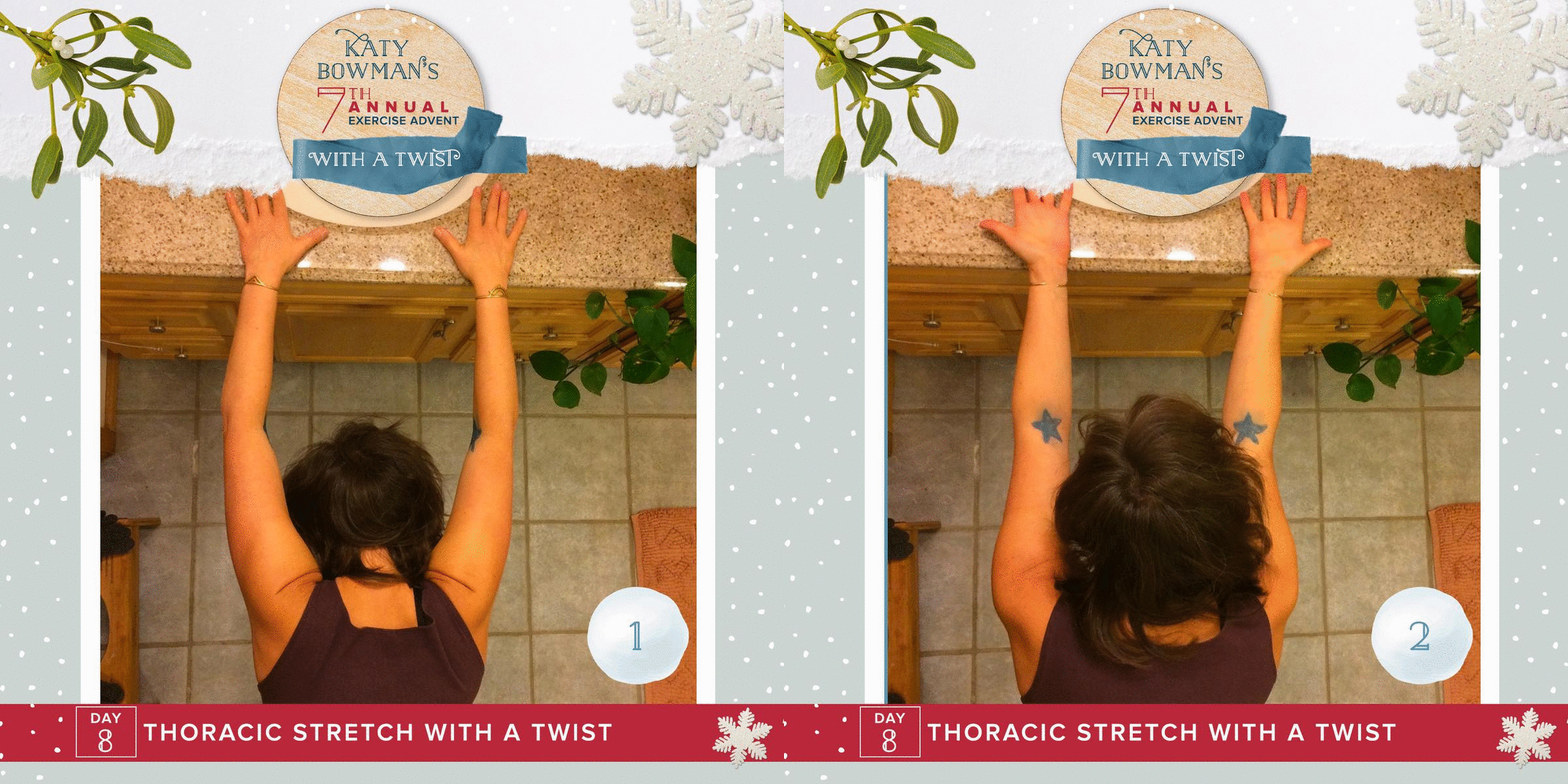
2. NOW HERE’S THE TWIST: We tend to do the Thoracic Stretch in internal rotation (stars facing each other as in #1). Lifting your head and ribcage up as you need to (see #2), turn your elbow pits up so they point up (as they can) to the ceiling. You might have to come waaaay up. Holding the stars in place, let your torso relax back down (see pic #3 below) and see where it goes. If it can’t move without your arms turning too, you’ve found another sticky spot!
Your arms might be able to go overhead while internally rotated (stars facing each other) but ideally you should have a greater range of "STARS UP," as we'll see in an advent exercise up in a bit. #exerciseadvent #moveyourdna #alignmentmatters
WHAT DO YOU THINK SO FAR? WHO'S FEELING STICKY?
Exercise Advent, Day 9: Twisted Floor Angels
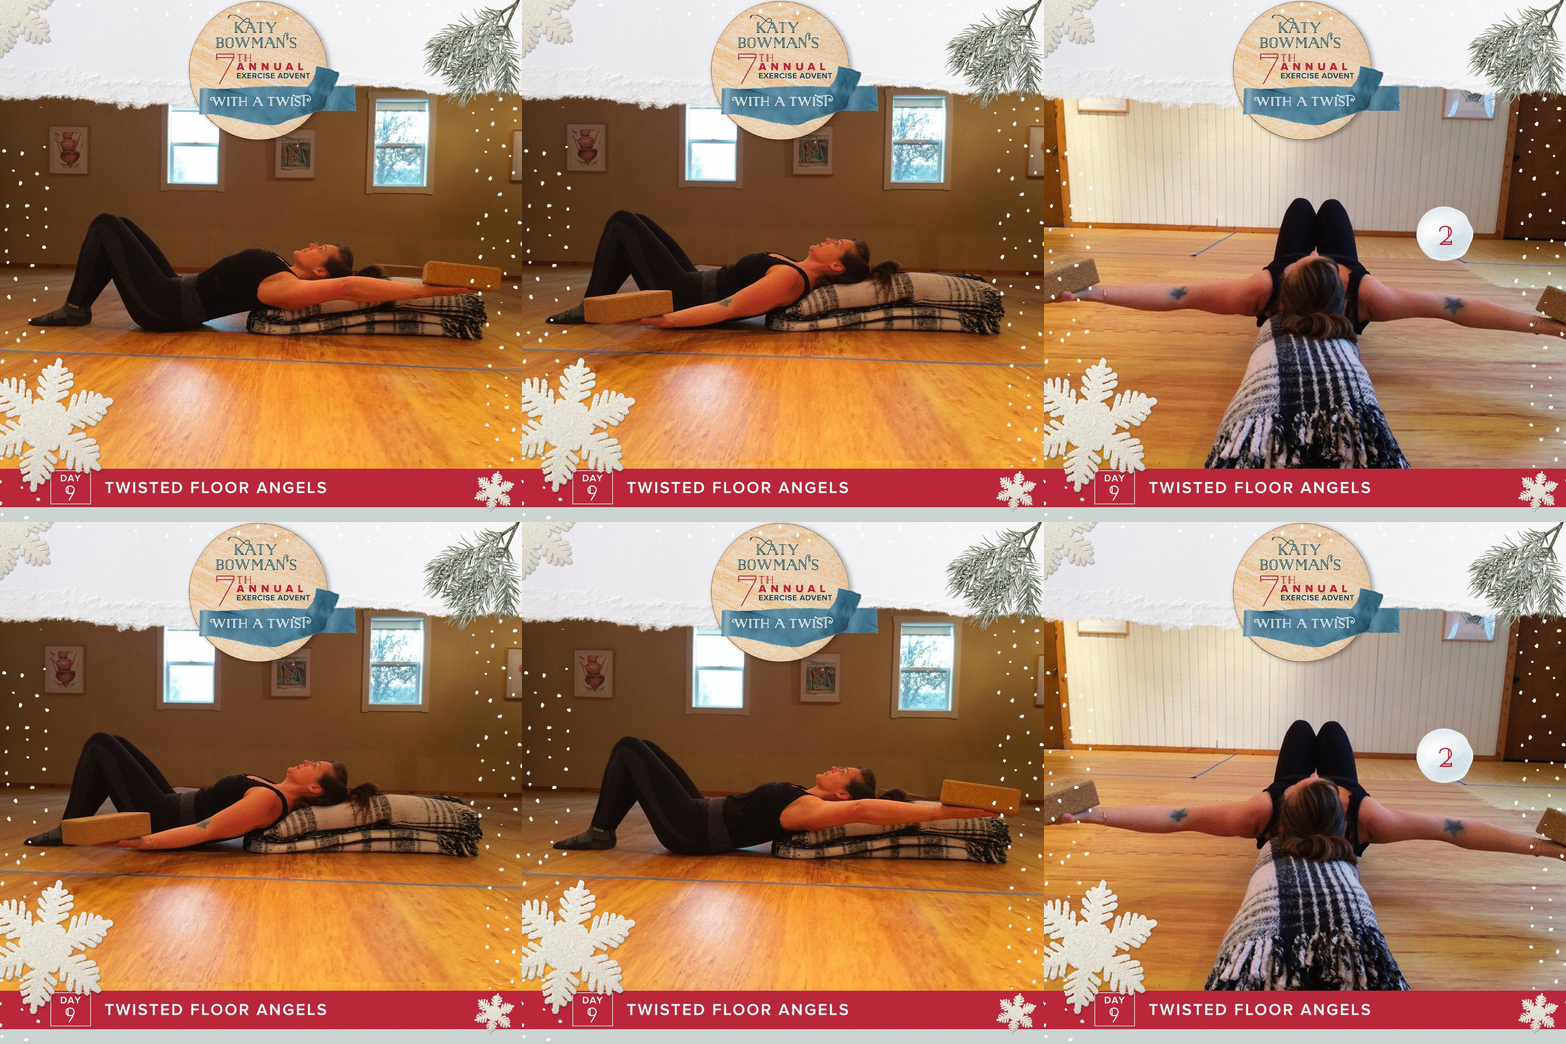
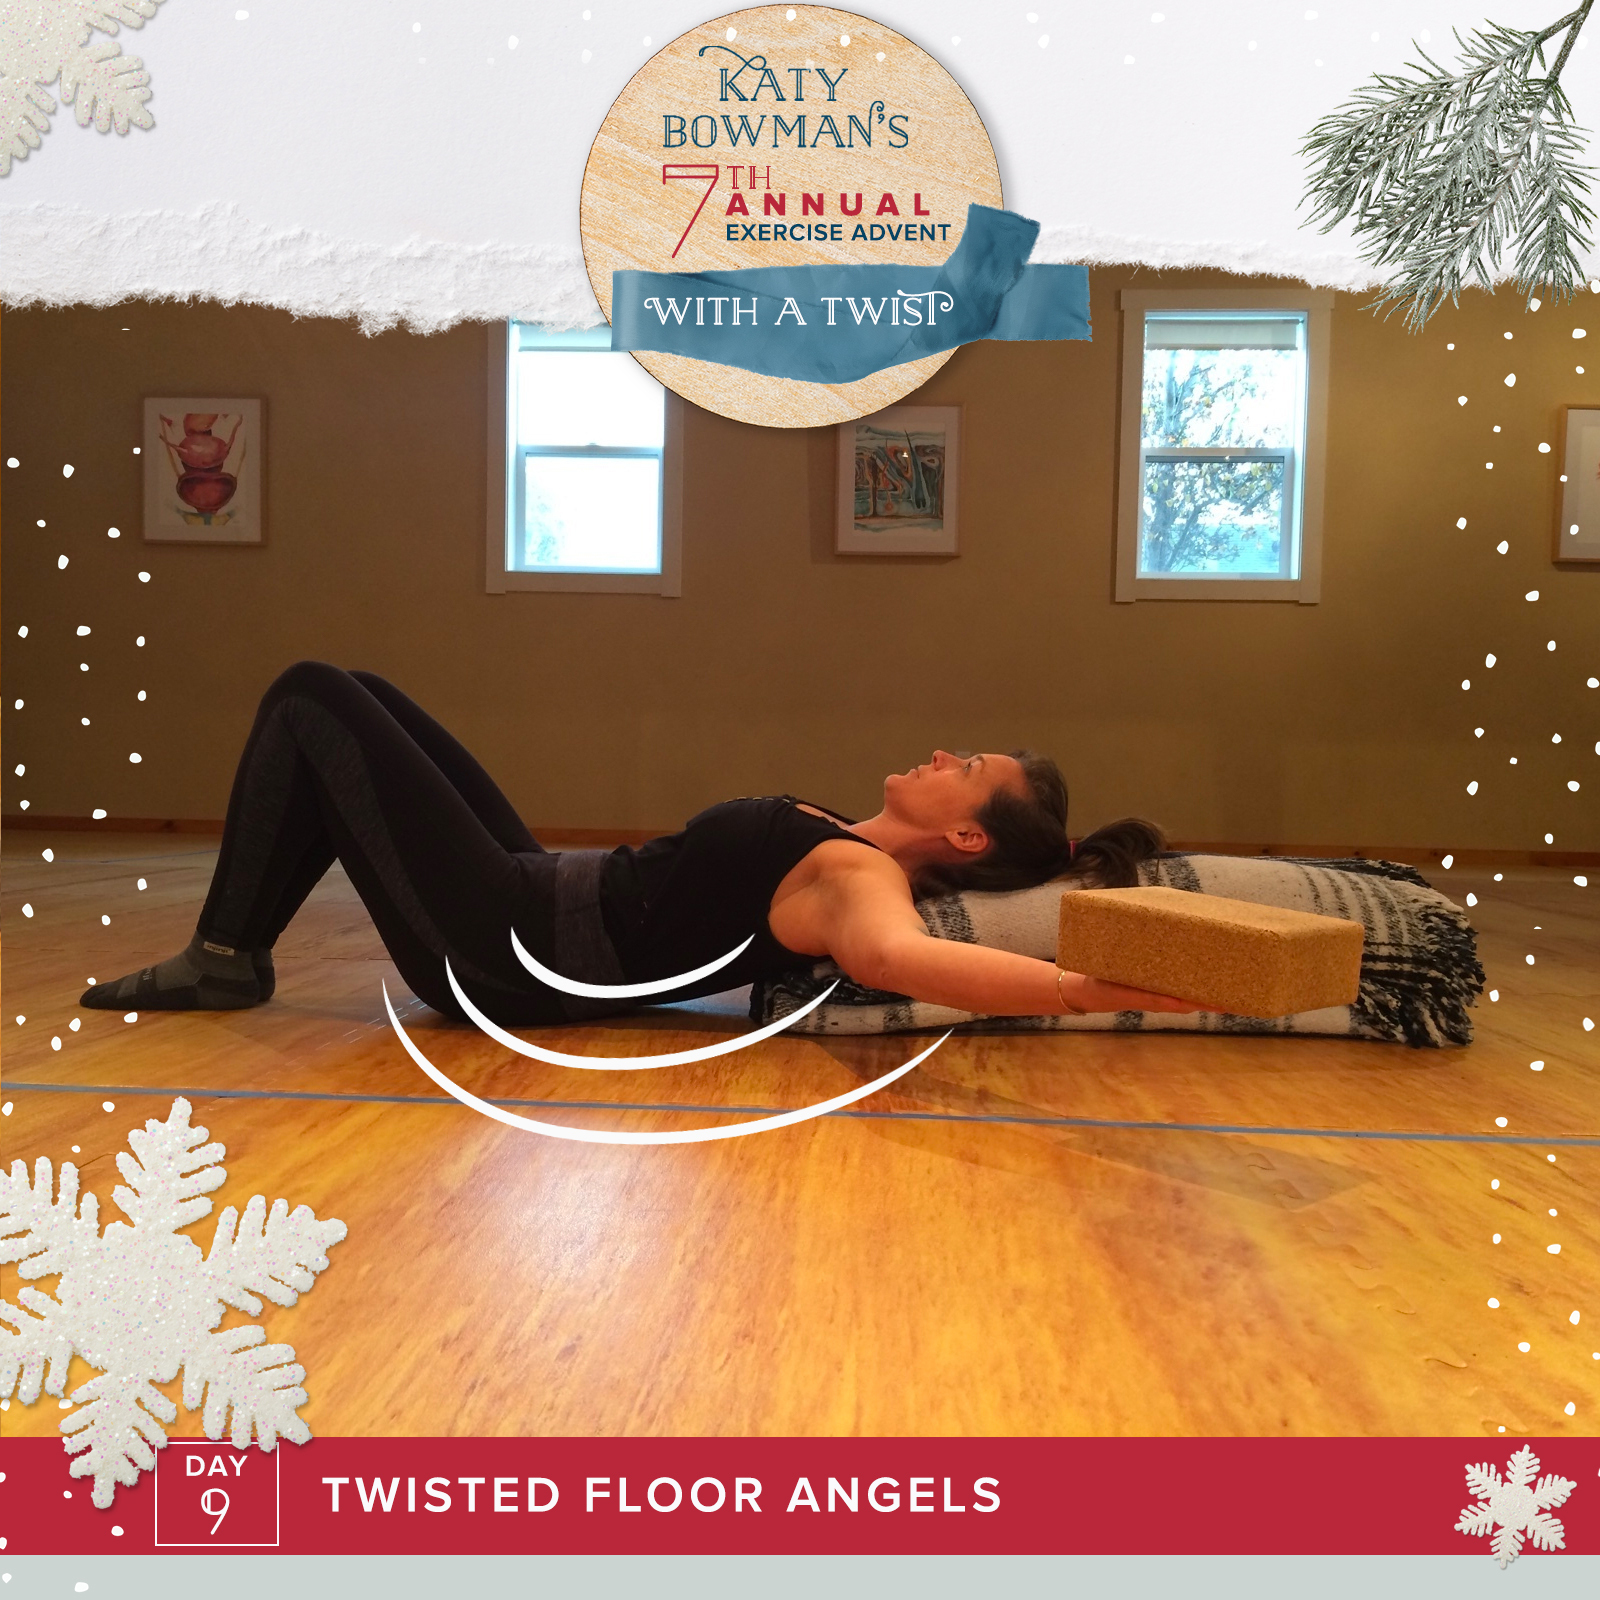
Floor Angles are another vintage move. This year we’re getting a little twisted (and weighted, if you’d like). You’ll need a blanket, bolster, towels, or sleeping bag and a couple of yoga blocks, books or other light weights. If you're not using to moving your shoulders much, do this UNWEIGHTED.
1. Start by lying on your back with your bolstering propping your head and shoulders—not under your rib cage though, the rib cage needs to be able to move toward the floor.
2. Now, make “snow angel” motions, sweeping toward the top of the head and back down toward the hips. What makes this exercise so dynamic is the bolster—it allows your arms to be slightly behind you, a direction they rarely get to go.
Do this a bunch of times, paying close attention to your ribcage and the tendency it might have to lift up (low back arch) to get your arms overhead. STICKY SHOULDERS CAN MOVE RIB CAGES AND LOWER BACKS!
3. HERE’S THE TWIST (are you ready?): When your arms are out to the side, the elbows will tend to drop toward the floor. This rotates your shoulder joints inward a bit. To move your chest walls and shoulders well, LIFT your elbows upward so your stars point toward your head (external rotation).
4. Stabilizing your stars up, repeat those floor angles to see how they compare. And did I mention to keep those RIBS DOWN yet? Mind them!
P.S. Some behind the scenes info: I tried out a few different names for this exercise including “Loaded Angels” and “Twisted, Loaded Angels on the Floor,” both which sounded like a holiday drinking game. Ribs up? DRINK!
Exercise Advent, Day 10: Twisted Around Your Finger
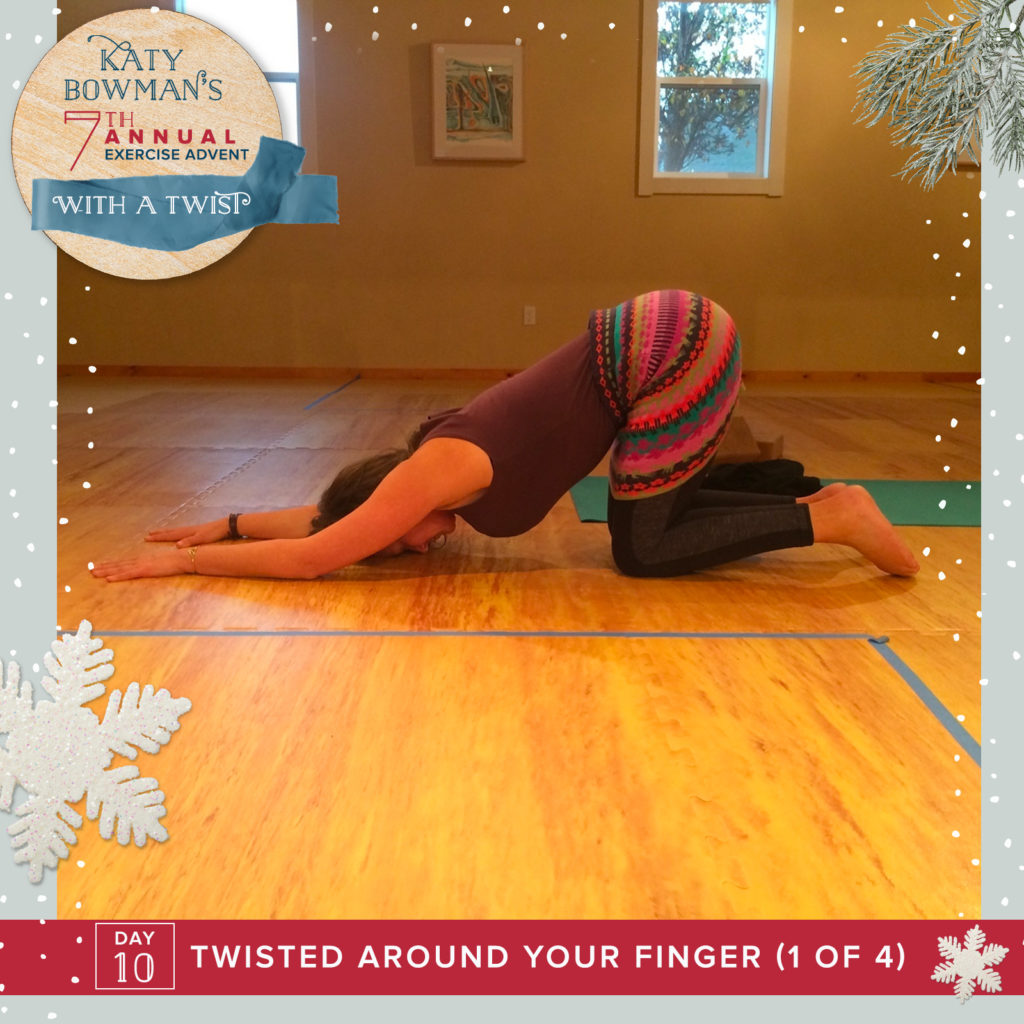
We’re in search of other sticky spots today, specifically those between the hands and shoulders.
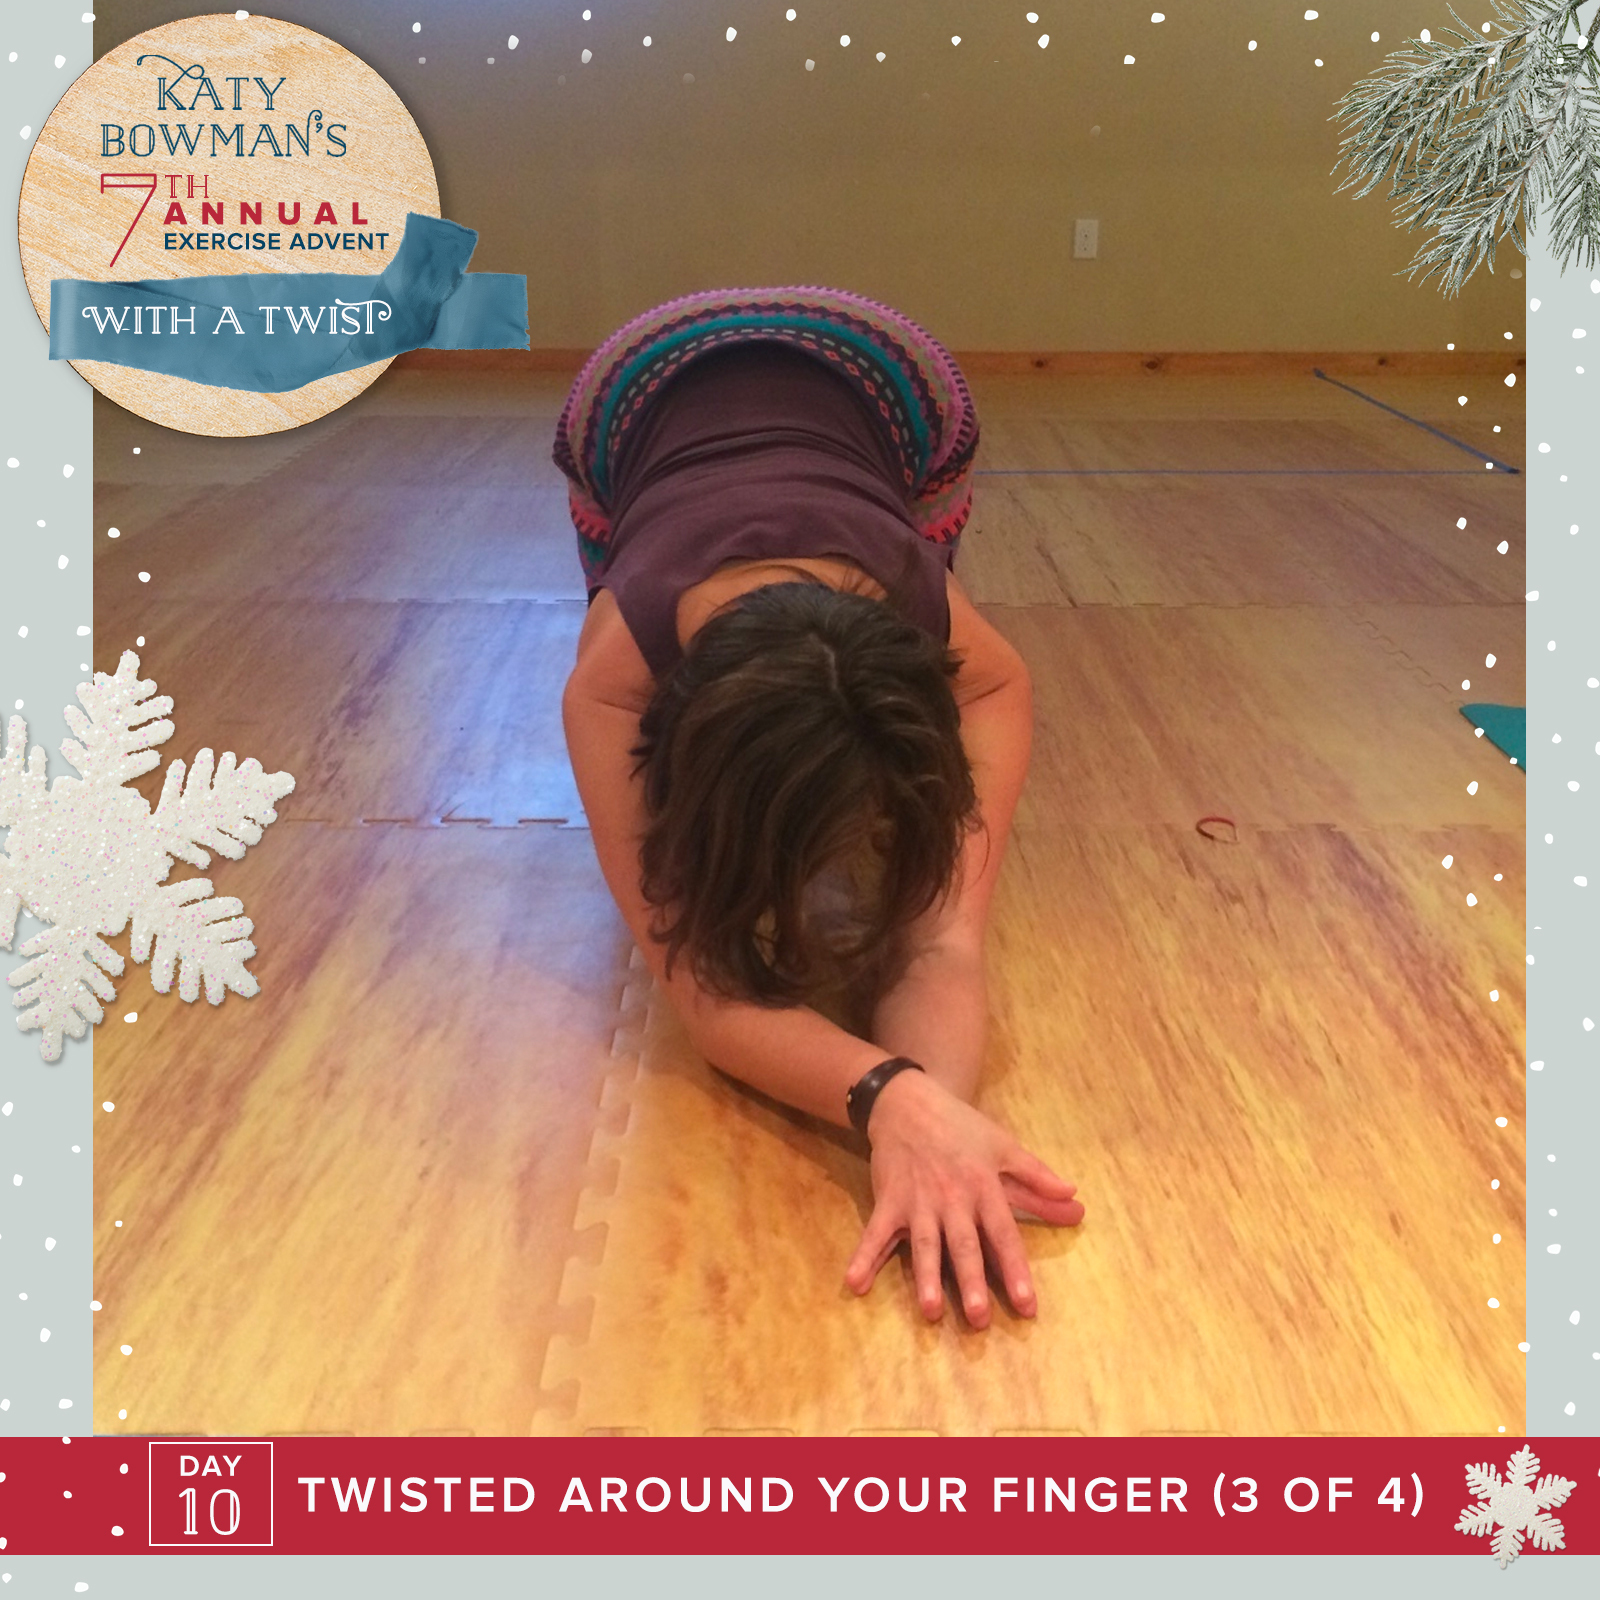
1. Start on your ELBOWS and KNEES, and walk your knees back to allow your chest to the floor (make sure your knees are not under your chest preventing it from lowering to the ground). See Pic 1 above.
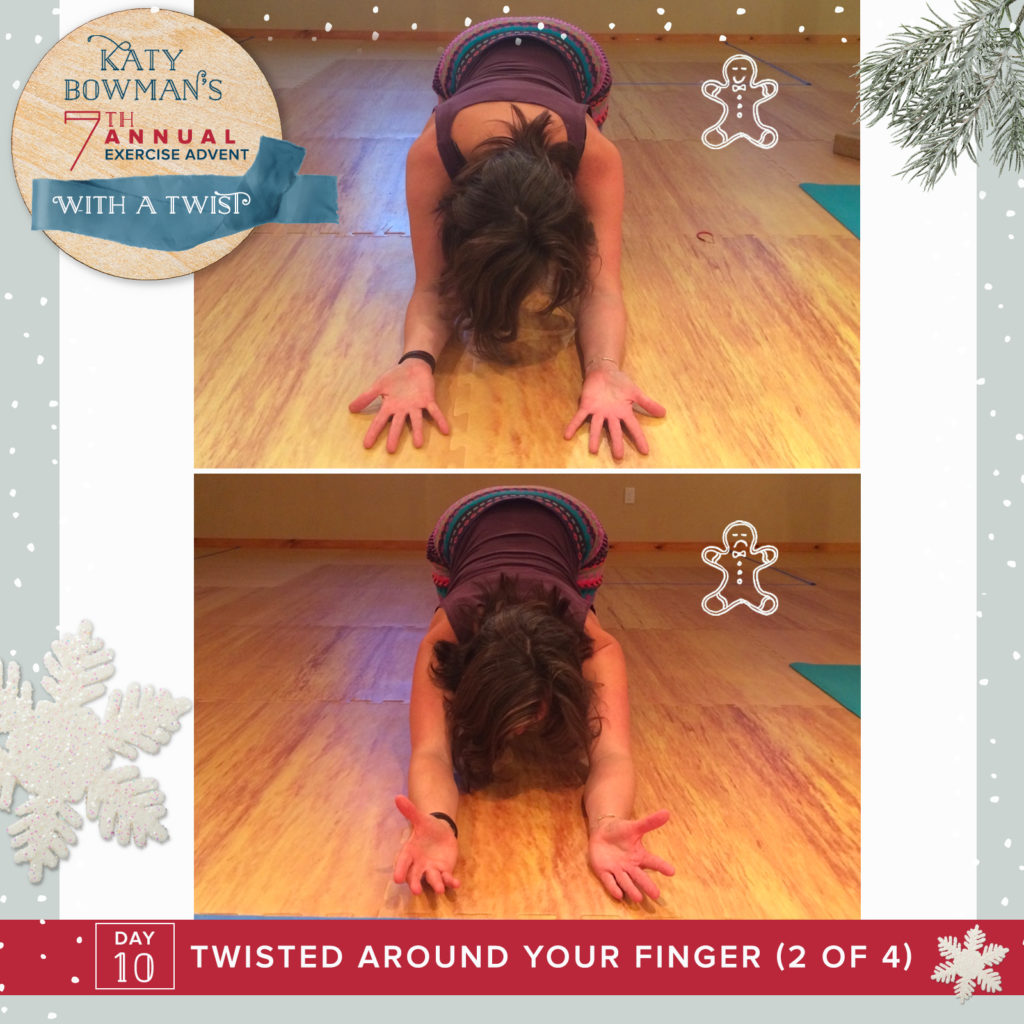
2. Here’s your twist: While staying back in your upper back stretch, FLIP YOUR HANDS SO THE PALMS FACE UP. Do they lie flat, with the thumbs down on the ground? Or are the thumbs up in the air?See pic 2 below.
Many of you will have the thumbs lifting up, which just means the hands and shoulders are too connected, which means certain hand positions can push your shoulders around, and vice versa. To see if your shoulders are moving your hands, come forward, out of the upper back stretch (less shoulder stretch), to see if that helps the hands lie flat.
Today’s move is how we unstick them.
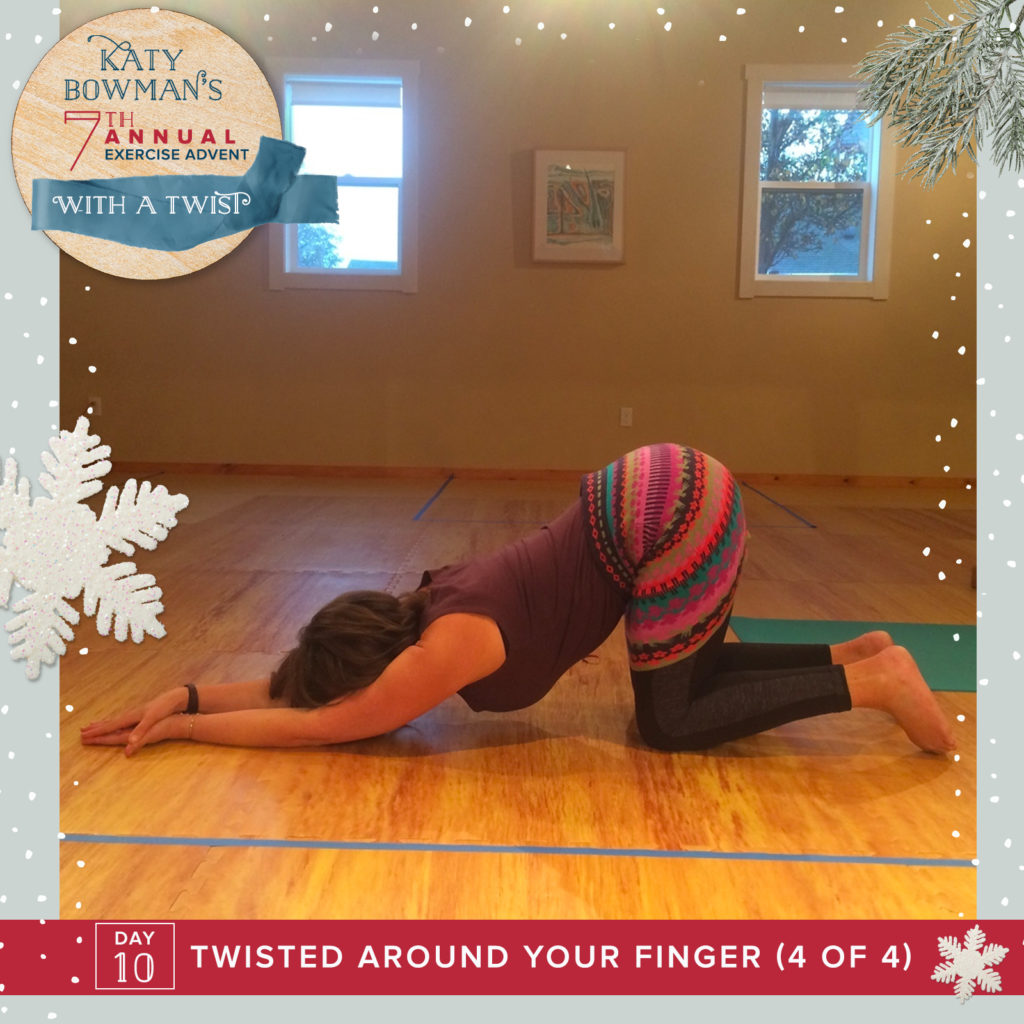
1. Go back to an “elbows and knees” quadruped, and place one hand directly on top of the other to pin that thumb to the ground and keep the hand flat (your hands are palm to palm, the top hand stabilizing the bottom hand!). See pic 3 below.
2. Slowly walk your knees back to drop your chest toward the floor, stopping once your hand can't stay down. With your hand held in place, you will feel where the sticky spots are (in the elbow flexors, in the shoulders, etc.). Hold, breathing, making the stretch more or less depending on how far you sit back. See pic 4 below.
Practice this regularly and you’ll reduce some of the tension between your hand and shoulders, which will come in handy for the next move!

Exercise Advent, Day 11: Hanging…With A Twist
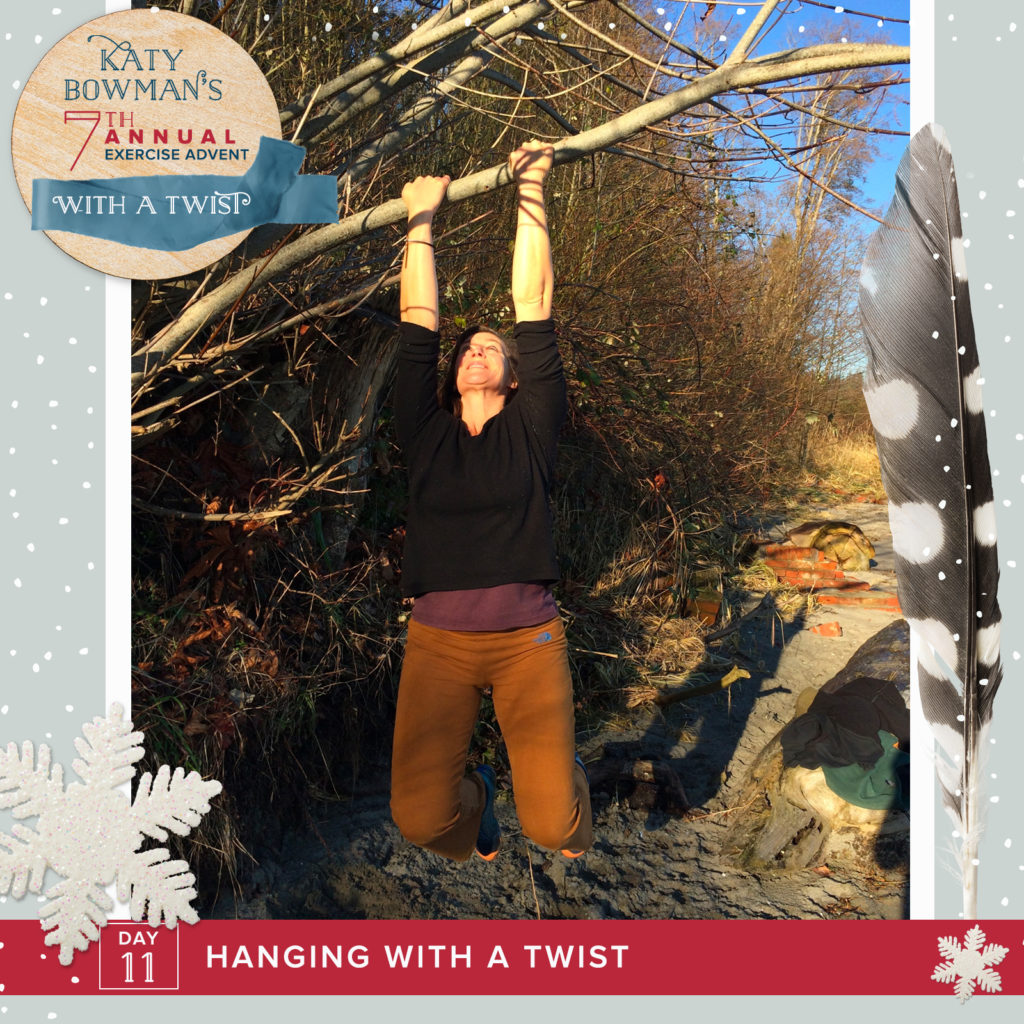
Today’s move brings Days 6-9 together. You can find hanging tutorials on my website (linked in bio), but these exercises take us deeper into the phenomenon of why hanging can create tissue damage at the elbows, shoulders, linea alba, and lower back in some bodies. The move is simple (which doesn’t always mean easy). You’re going to get your hands on a pull-up bar or branch. If you don’t have either available, see if you can rig a broomstick so you can create a low-load version—do not hang in this case. GOT IT? The twist is going to be your hand position. Instead of putting your palms facing away to grip the bar, you’re going to turn your palms toward your face (as you practiced in yesterday’s move).
When you go to hang (or you can also lower away from the bar while keeping your legs on the ground for support), your arms move overhead as they were in the palms-up thoracic stretch. In sticky shoulders, this can (as you might have already experienced) create pulling across the elbow joint, in the shoulders, and can also make you thrust your rib cage. If these are happening in the lower-load moves earlier in the advent, then you can expect them to happen in this move too—only now with an even greater load. This is often why hanging is contraindicated for things like Diastasis Recti.
I approach movement in this way: rather than labeling moves as dangerous (because that list will just keep getting longer and longer in a sedentary culture), I like to show why a body might not be suited for a move…and what to do about it. In this case, you’ve got some moves to play with that will change what’s happening when you hang in this way!
Exercise Advent, Day 12: The Whole Body Twist
We’re moving to the torso and starting with the most gentle whole-body twist I could think of.
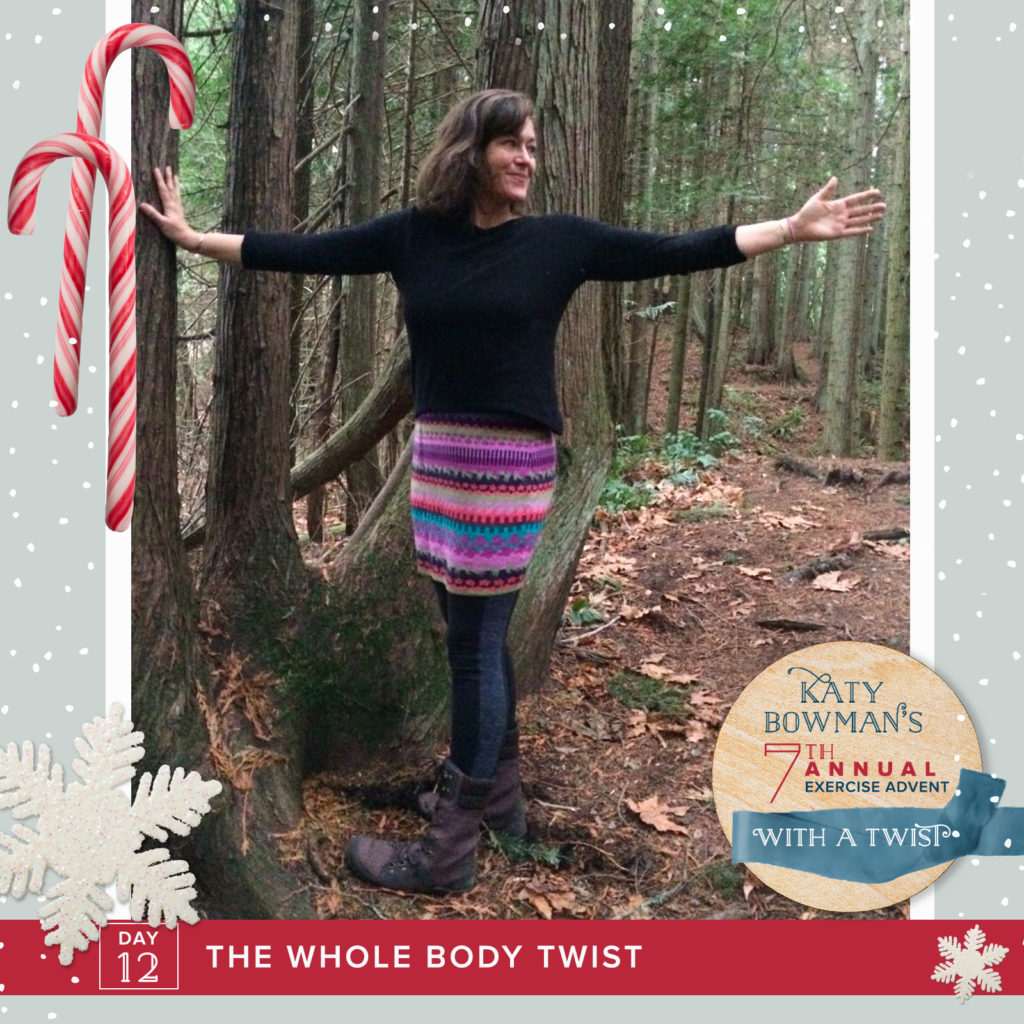
1. Start facing a wall (or any place you can place a flat palm like a TREE), ankles pelvis-width, feet straight. Anchor the palm of your hand at shoulder height and reach the top of the head up toward the ceiling.
2. Keeping your feet and wall-hand fixed, turn to reach and look as far behind you as you can. Let your ankles, pelvis, shoulders and spine all “twist” to help you get there. Remember the spot you were able to look upon as a means to measure.
3. Repeat the other side. How do the two compare? Get Dian Fossey on yourself. Can you reach the same spot in both directions? Do your ankles and pelvis turn equally either way. What about arm reach and head turn? Does the palm of one hand ever want to sneak off to help you twist farther (SNEAKY STICKY!).
This is a simple move you can do multiple times a day that doesn’t require getting on the floor, that can move you a little bit head to toe, in a way that’s not found in most of our activities of daily living. The rotational qualities of the body are a gift. Make sure you OPEN THEM every day!
Want something more? Start stabilizing the ankles (put your knee pits behind you and hold them there). How far can you turn now? Then hold your pelvis center as you turn. How does this change which parts have to move more? MORE TWISTS COMING RIGHT UP!
Exercise Advent, Day 13: Rib Twist
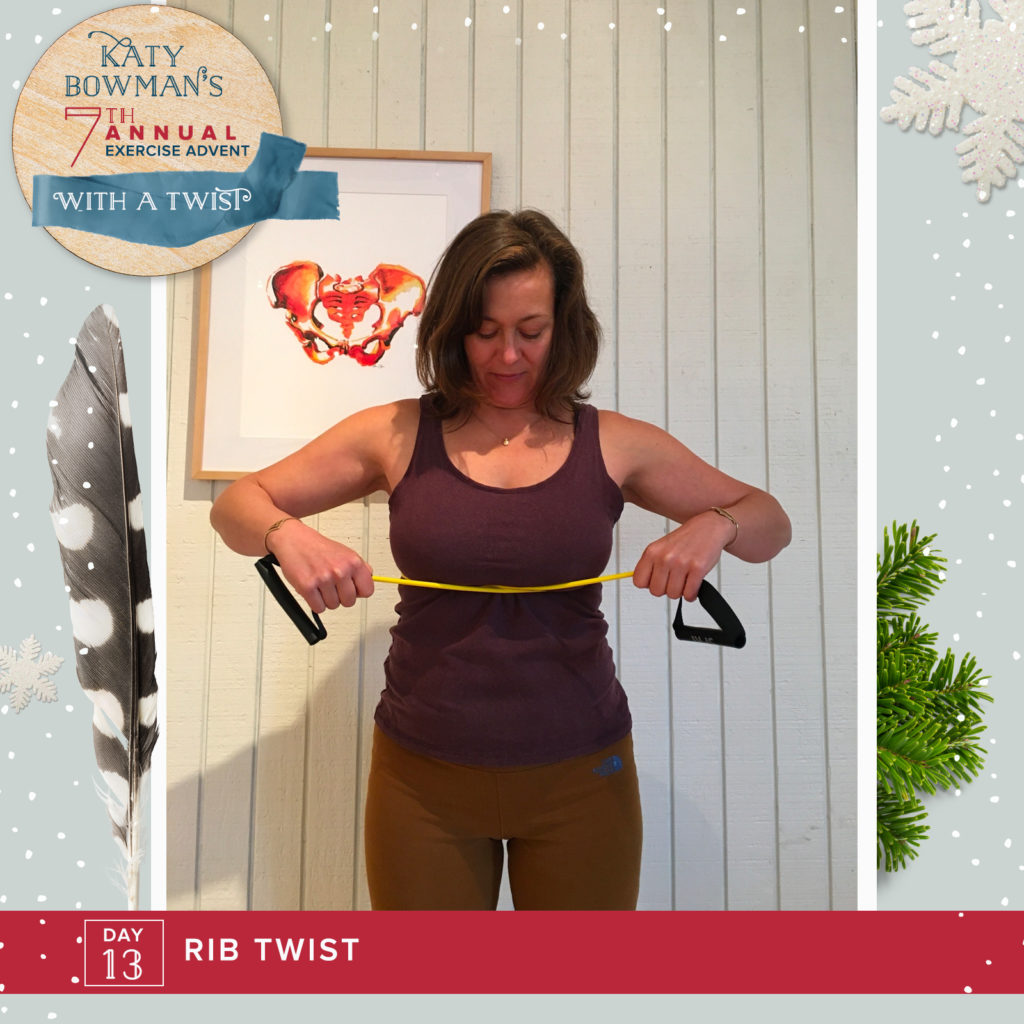
The entire rib cage can move—when you lift or twist the torso—but the individual ribs that make up the rib cage also move on their own: THEY TWIST. And when the ribs each rotate individually, the rib cage changes shape—when ribs twist up, the rib cage’s circumference gets bigger and when ribs twist down, the rib cage gets smaller.
Today’s twist will probably be the most subtle; you’re going to be twisting up and down with a breathing exercise that helps you find your intercostal muscles (muscles in between each rib).
1. Seated or standing, firmly tie a resistance band or pair of tights around your rib cage just beneath your chest muscles or breasts. Or, you can put your hands on your waist and slide them up until your hands are up on your ribcage. Reach your head up toward the ceiling to lengthen the spine.
2.Inhale slowly and deeply, trying to expand the rib cage into the band or your hands. Keep the shoulders down and relaxed.
3.Exhale as much as you can, trying to bring the rib cage away from the band or your hands (it’s natural for your abdominals to contract in efforts to exhale fully).
There’s a reason this move is in the “torso twists” section. In order for the spine to rotate well, the rib/vertebrae joints each need to be able to move. To best prepare the body for spinal twisting, the middle spine’s vertebrae need to be freed. The rib-spine joints get sticky, which then makes spinal twists tricky. Thus, we will prepare for spinal twists starting with the upper body.
Exercise Advent, Day 14: Seated Torso Twist
We’re finally at a spinal twist! Here’s some basic info:
A spinal twist is measured by the distance your nose can turn away from your pelvis. This movement is created by the sum total of each vertebra rotating its small bit. The lower (lumbar) vertebrae actually move a small amount compared to the vertebrae in your middle back (thoracic), but many of us have sticky upper spines and ribs, so when we try spinal twists, all our movement comes from the lower back and the neck instead. ← Not optimal.
You might have heard of a “neutral spine.” This means the position of a spine from which all spinal movements—flexion, extension, lateral bending, and rotation—can be maximized. If you sit sort of slouching, your twisting is affected because vertebrae can’t rotate as much when they begin their twist tipped a bit forward or backward. Loads to vertebrae and their parts (nerves, discs) can also get high when twisting in these cases.
A lot of us have too much forward curve in the upper back, and sticky ribs. We’re trying to twist with an upper back that can’t participate. Good news: We’ve been working on the spinal twist since Day 1. Tight shoulders and stiff upper backs often go together. You might even run through previous moves before doing this one.
Finally, don’t "help" today's twist by pulling yourself deeper with your arms. You’re only going to twist as far as your abdominal muscles can take you.
1. Start seated and set yourself up with a neutral spine as best you can. Neutral pelvis (no slouching), rib cage centered above it, reach the top of your head up toward the ceiling, which will also pull on any excessive neck or upper back curvature. (See “Head Ramp” on my website for more.)
2. Letting your arms relax on your legs (no pulling), turn the rib cage from the pelvis using the muscles in your waist. Once you’ve turned, do a few rib twist breaths (you can put your hands on your rib cage while you’re in a twist to remind you which parts to move), and make sure your head is still reaching for the sky. Then, turn to the other direction and do the same. You can add a slight head turn, but we’ll focus more on that shortly. For now, this is about getting your waist-twisters mobilized as well as any sticky parts in the upper back.
3. Be gentle, but do a handful in each direction. Bonus twist? Cross your legs (keep the pelvis neutral) and see how that changes things. WHERE ARE YOU STICKY?
Exercise Advent, Day 15: Twist-To-Lift Your Ribcage
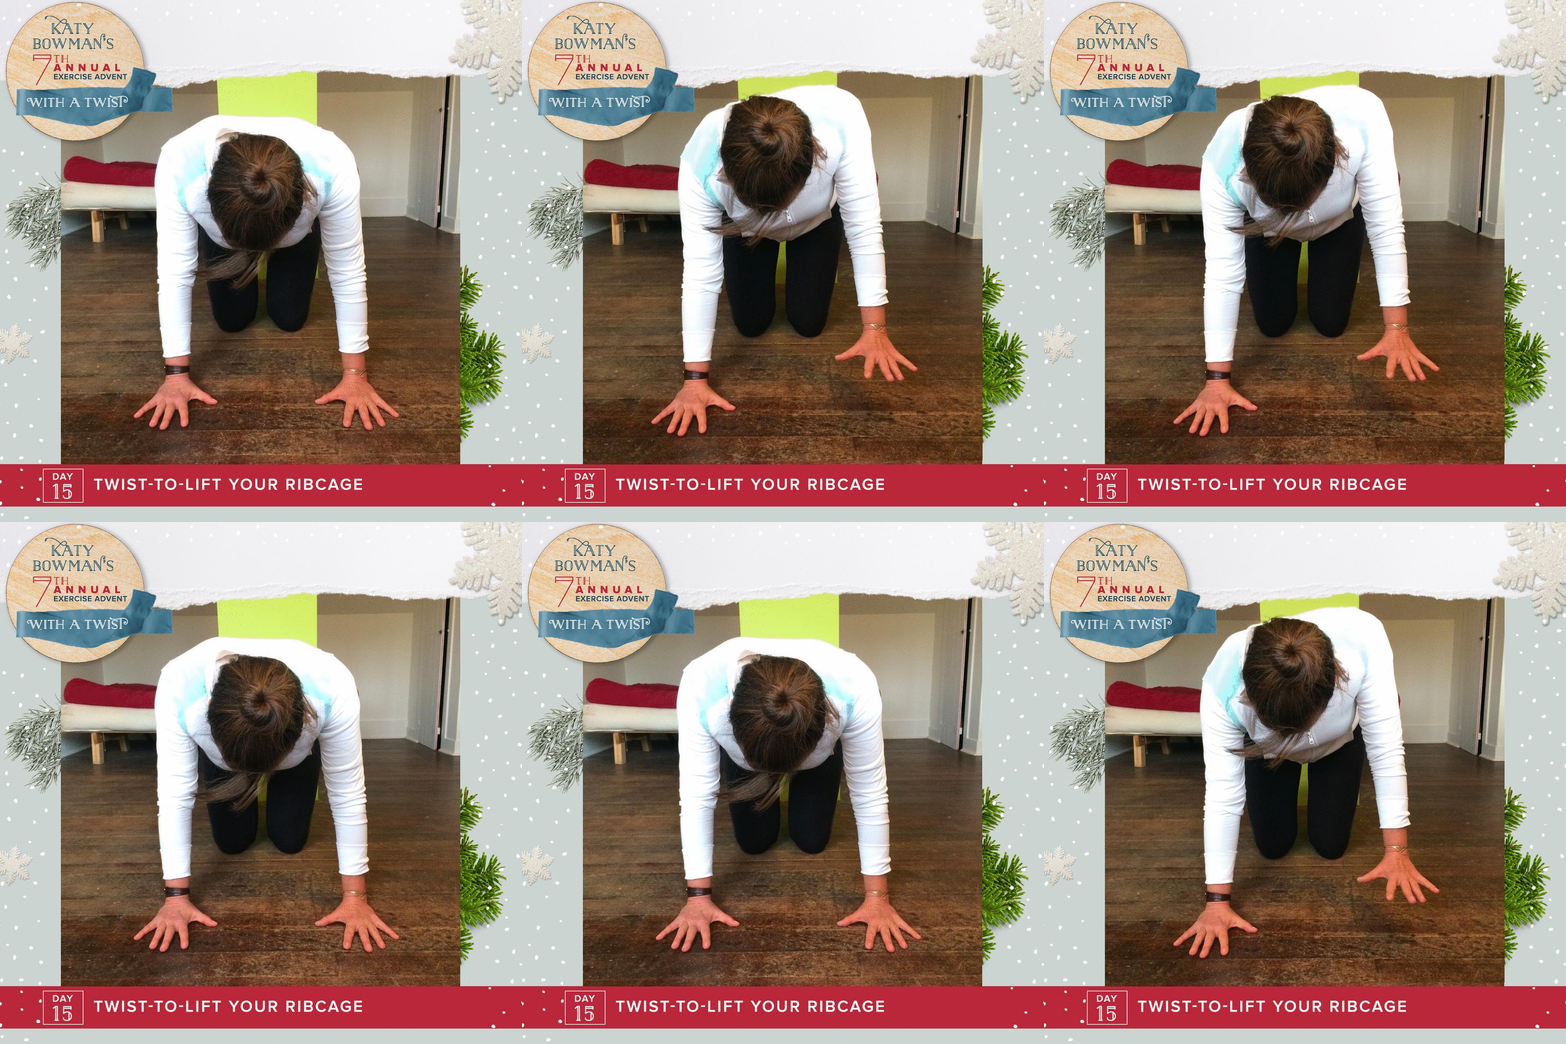
In the last move, you found the twisting muscles in your torso. We’re going to do that same motion, only now it will be harder because you have to twist your torso against the force of gravity.
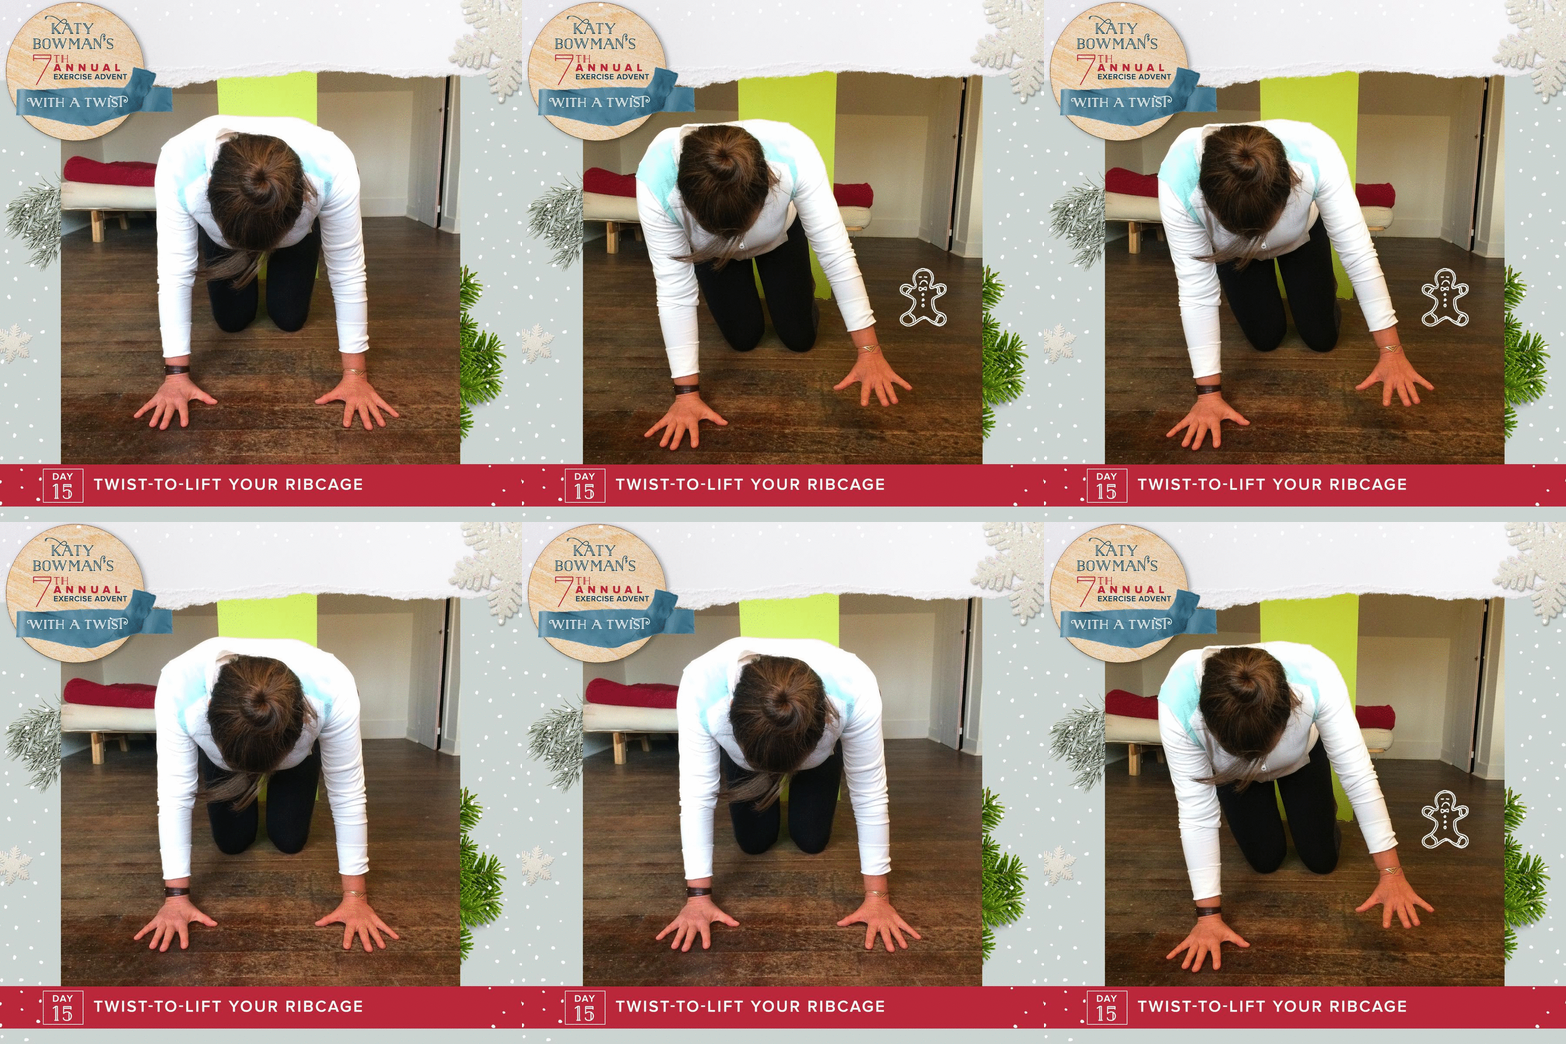
The goal here is to lift the right side of your ribcage up to the ceiling, which will also lift your right hand off the floor. How will you do it? BY TWISTING THE SPINE.1. Starting on your hands and knees, spine neutral, lift the right side of your ribcage up to the ceiling (video above).
2. Make sure you are not LEANING to get your hand up like this, below.
Leaning the torso and legs is how we AVOID the twist and abdominal use. Another way to avoid the twist: lifting the hand by pulling the shoulder blade toward the spine. Don’t do that one either.
3. Repeat this 8-10 times on each side (NO LEANING) or until you feel your waist muscles get tired!
Exercise Advent, Day 16: Twist-To-Lift Your Pelvis
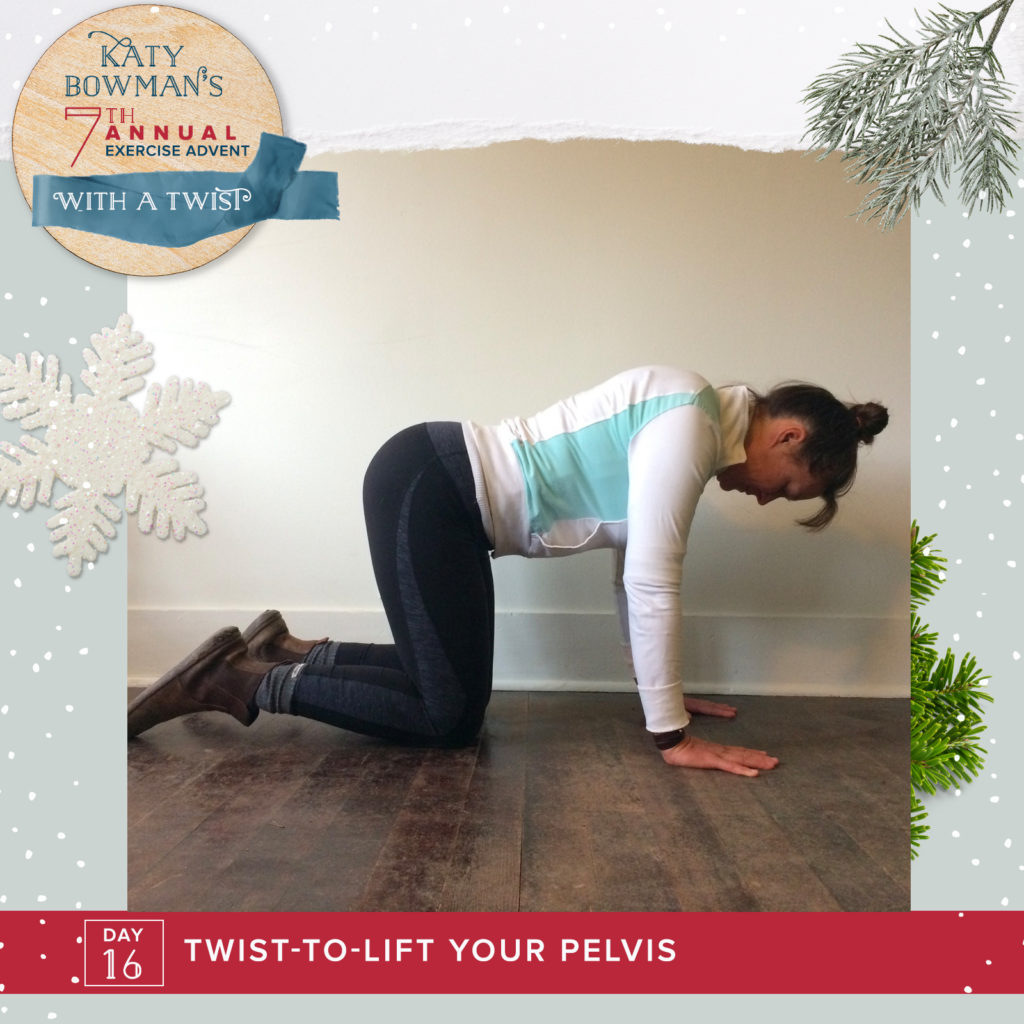
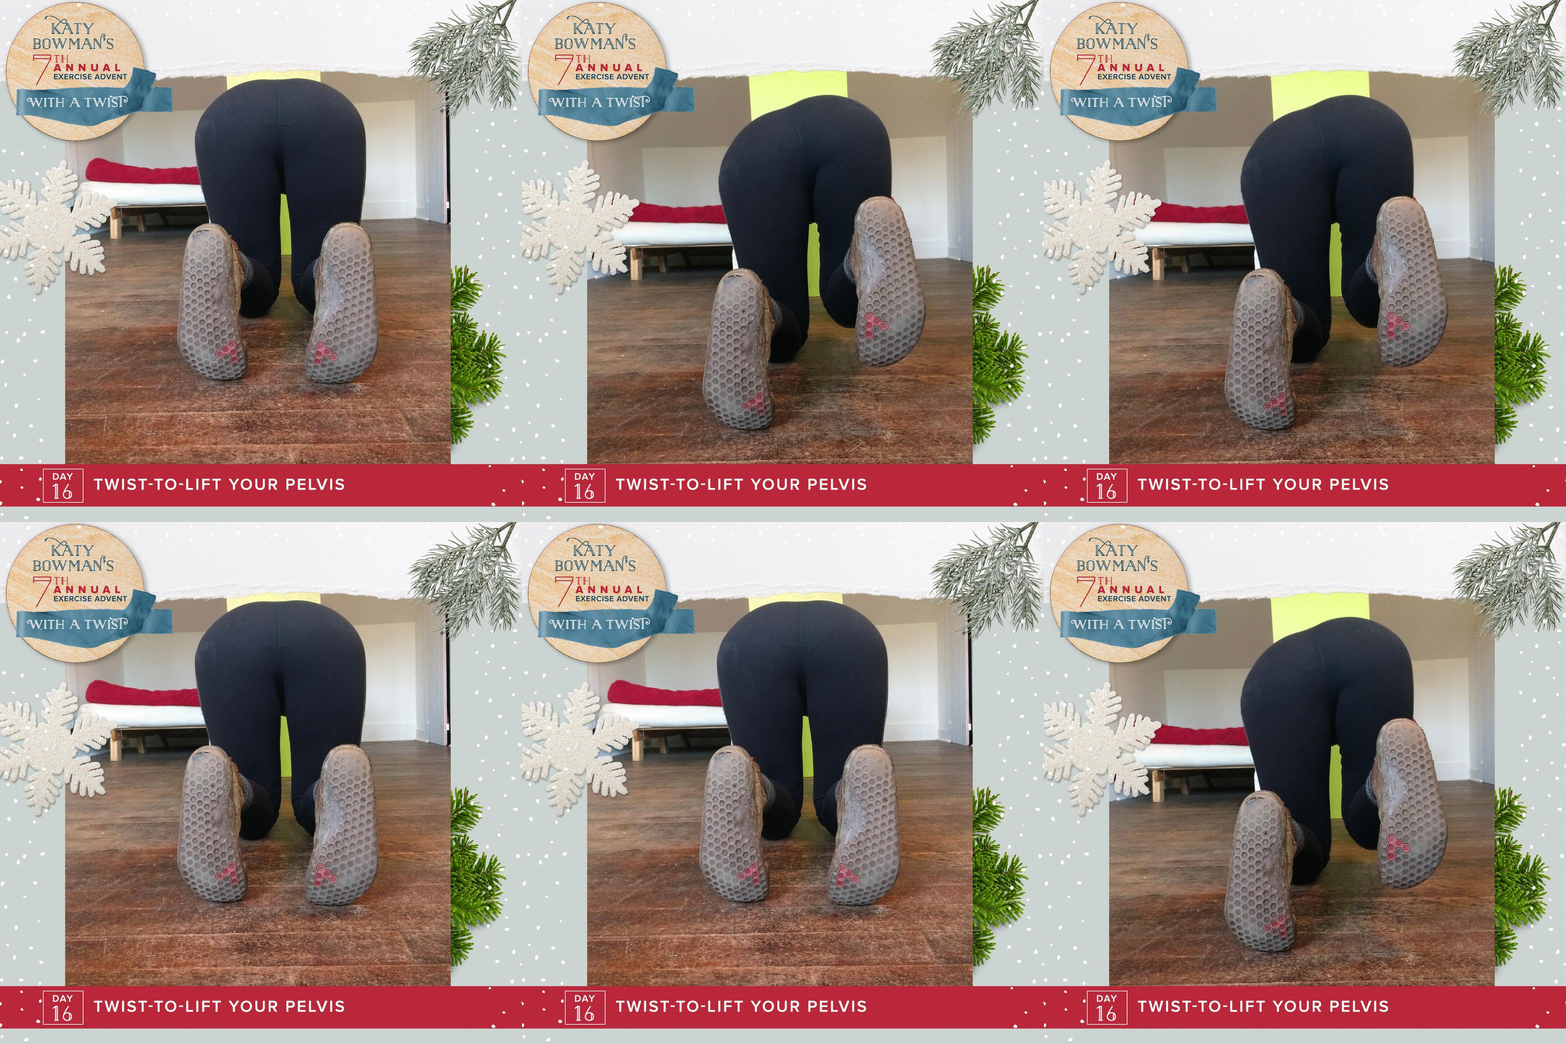
This exercise is almost identical to yesterday’s only instead of lifting one side of the ribcage, we’re going to lift one side of the pelvis. WITHOUT LEANING.
1. Starting on your hands and knees, spine neutral, lift the right side of your pelvis up to the ceiling, which will also lift that knee.
2. Butt, make sure you are NOT LEANING to get the knee up (see “sad gingerbread” image in yesterday’s exercise, slide 2).
Again, leaning the torso and legs is how we AVOID the twist and abdominal use. By keeping your arms and legs vertical, you’ll be forced to work the twisting abdominals.
3. Repeat this 8-10 times on each side (NO LEANING, AM I MAKING MYSELF CLEAR) or until you feel your waist muscles get tired! For extra fun, do a pelvis-lifting set followed by a ribcage lifting set. YOU ARE WELCOME. Now, stop looking at this picture.
Day 17: The Ribcage Lift-and-Lower Twist
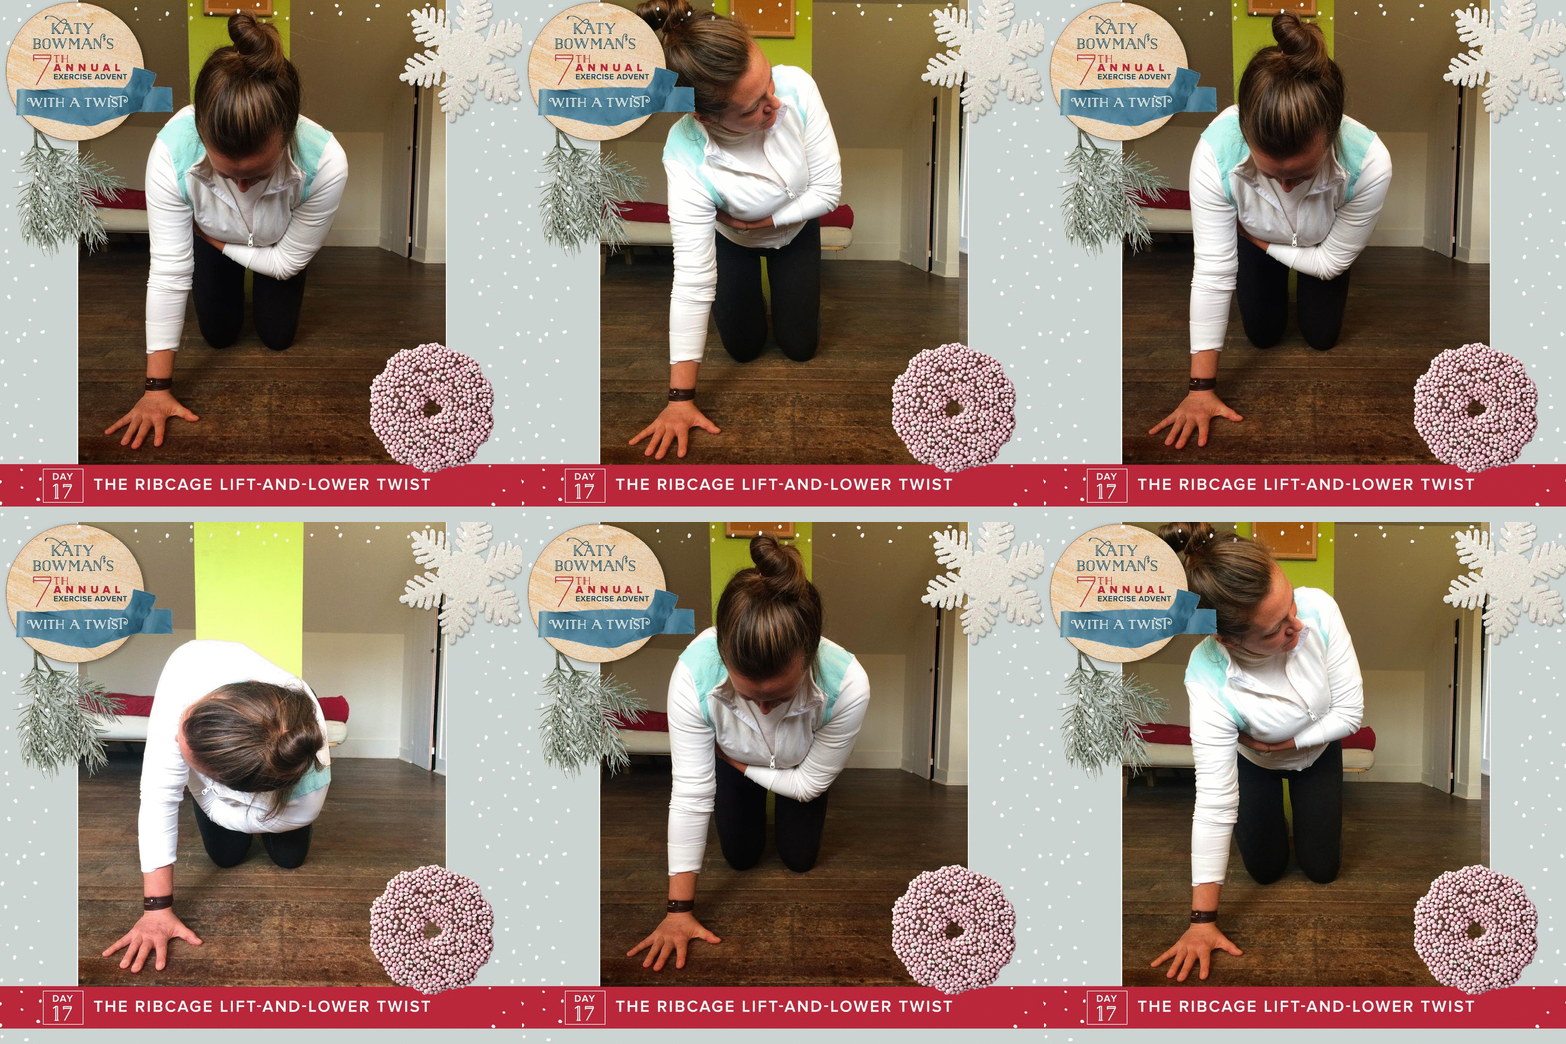
This move is a “part two” to Day 15. Go back and review that one real quick.Now that you’re a champ and twisting to lift your ribcage WITHOUT LEANING, see how you do twisting in the opposite direction to lower it down. Full range of motion, baby.
1. Starting on your hands and knees, pick up your left hand and wrap it around your ribcage. Let the left side of the ribcage drop, which will rotate your ribcage toward your weight-bearing arm. Hang out there for a bit.
2. Slowly lift the left side of the ribcage up toward the ceiling, turning it as far “up” as it will go. NO ______________ ←--- If you guessed "leaning", YOU ARE CORRECT.
How does it feel?
Day 18: The Pelvis Lift-and-Lower Twist
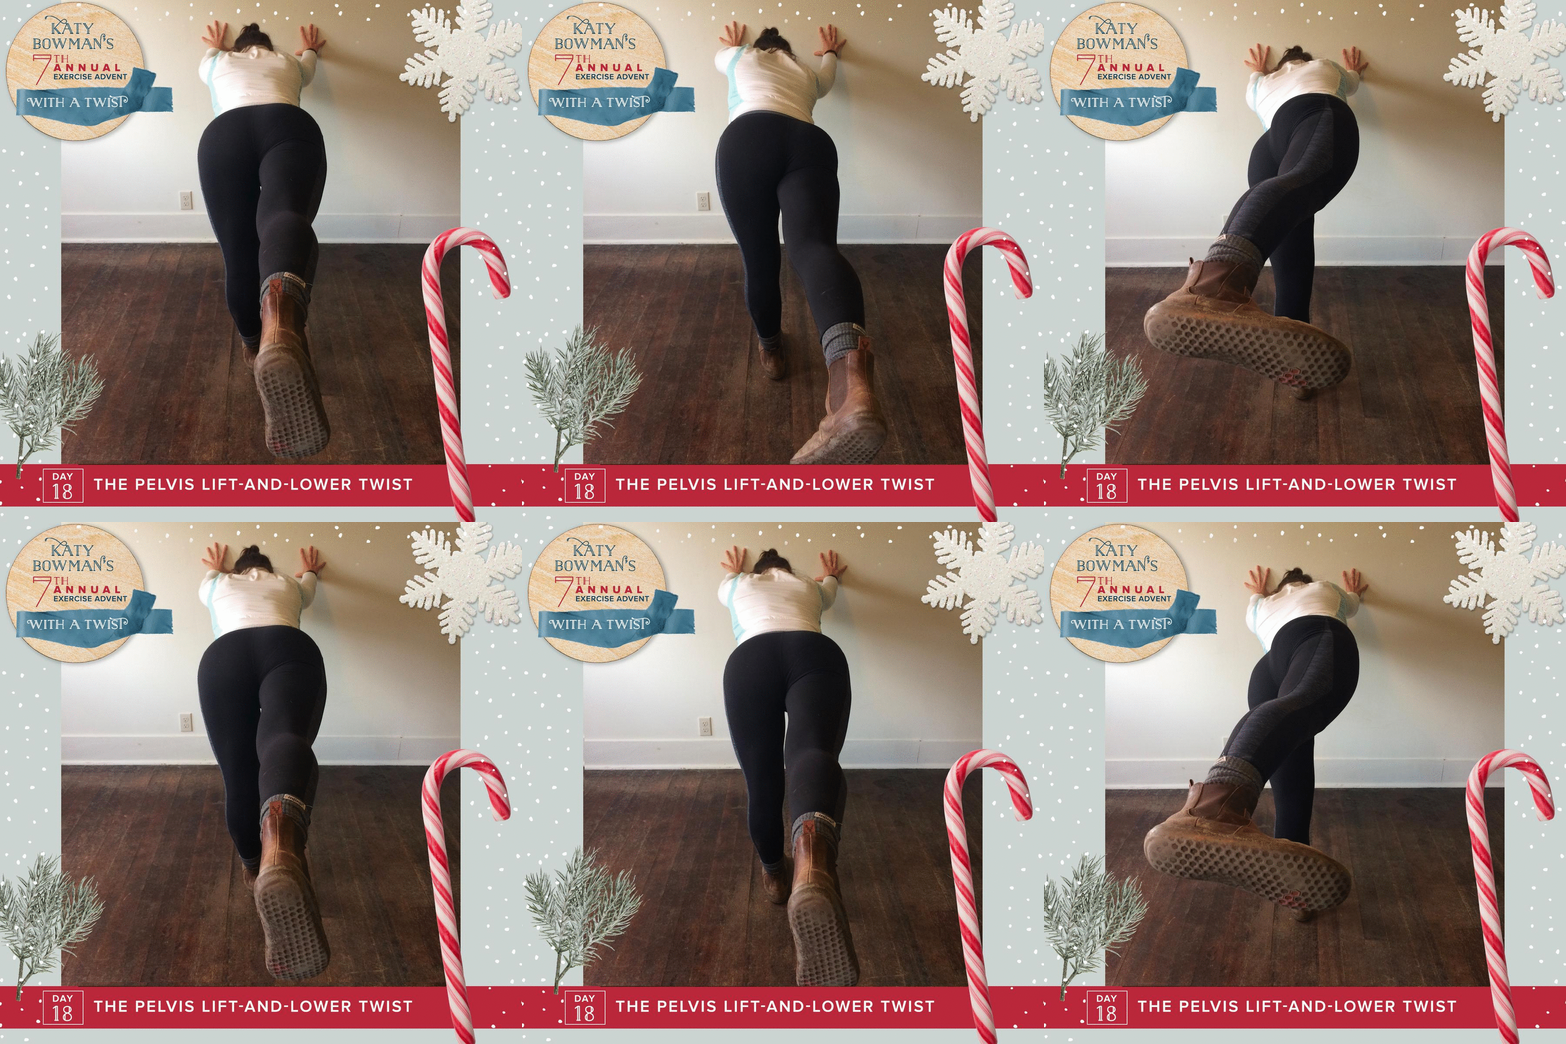
This move is a “part two” to Day 16. Go back and review that one, especially the part about LEANING. Today you'll be twist your pelvis around your hip joint for some serious butt and lateral hip action.
You have two options with this one—do it standing (pictured) or do a version on your hands and knees (see the bottom of the post for more on that).
1. Stand unshod or in flat shoes in front of a wall and place your hands on it.
2. With your hands still touching the wall, walk back and lift your left leg so all your weight is on your right leg.
3. Keeping the right leg straight (only bend slightly if your joint hyperextends), shift your weight back over your heel. The wall is there to help—use your hands on the wall to help you find the position.
4. Here's the twist: Slowly lower the left (floating) side of the pelvis toward the floor as much as you can, and then twist the pelvis back up toward the ceiling. Do this until you're tired!
Lower load options include: Doing this on your hands and knees (just straighten one leg and then lift and lower the now-floating side of the pelvis) NO LEANING. Also, you can do this standing with your arms/chest on a counter, which can hold more of your weight than a wall can, and lift and lower your pelvis there.
If you keep your weight back over your heel and your leg straight, you will MEET YOUR GLUTES. Who knew they' could twist!? #exerciseadvent #moveyourdna #alignmentmatters
Day 19: Before You Twist It, Ramp It
I said we’d get back to the neck twist, so here we go. Remember those sticky upper backs? They tend to come with sticky necks. Before we twist our neck, we need to get it closer to a neutral position. Neck curves can be a challenge to measure, but let’s start with moving the parts of our upper back and shoulders that help create spinal curves in the first place.
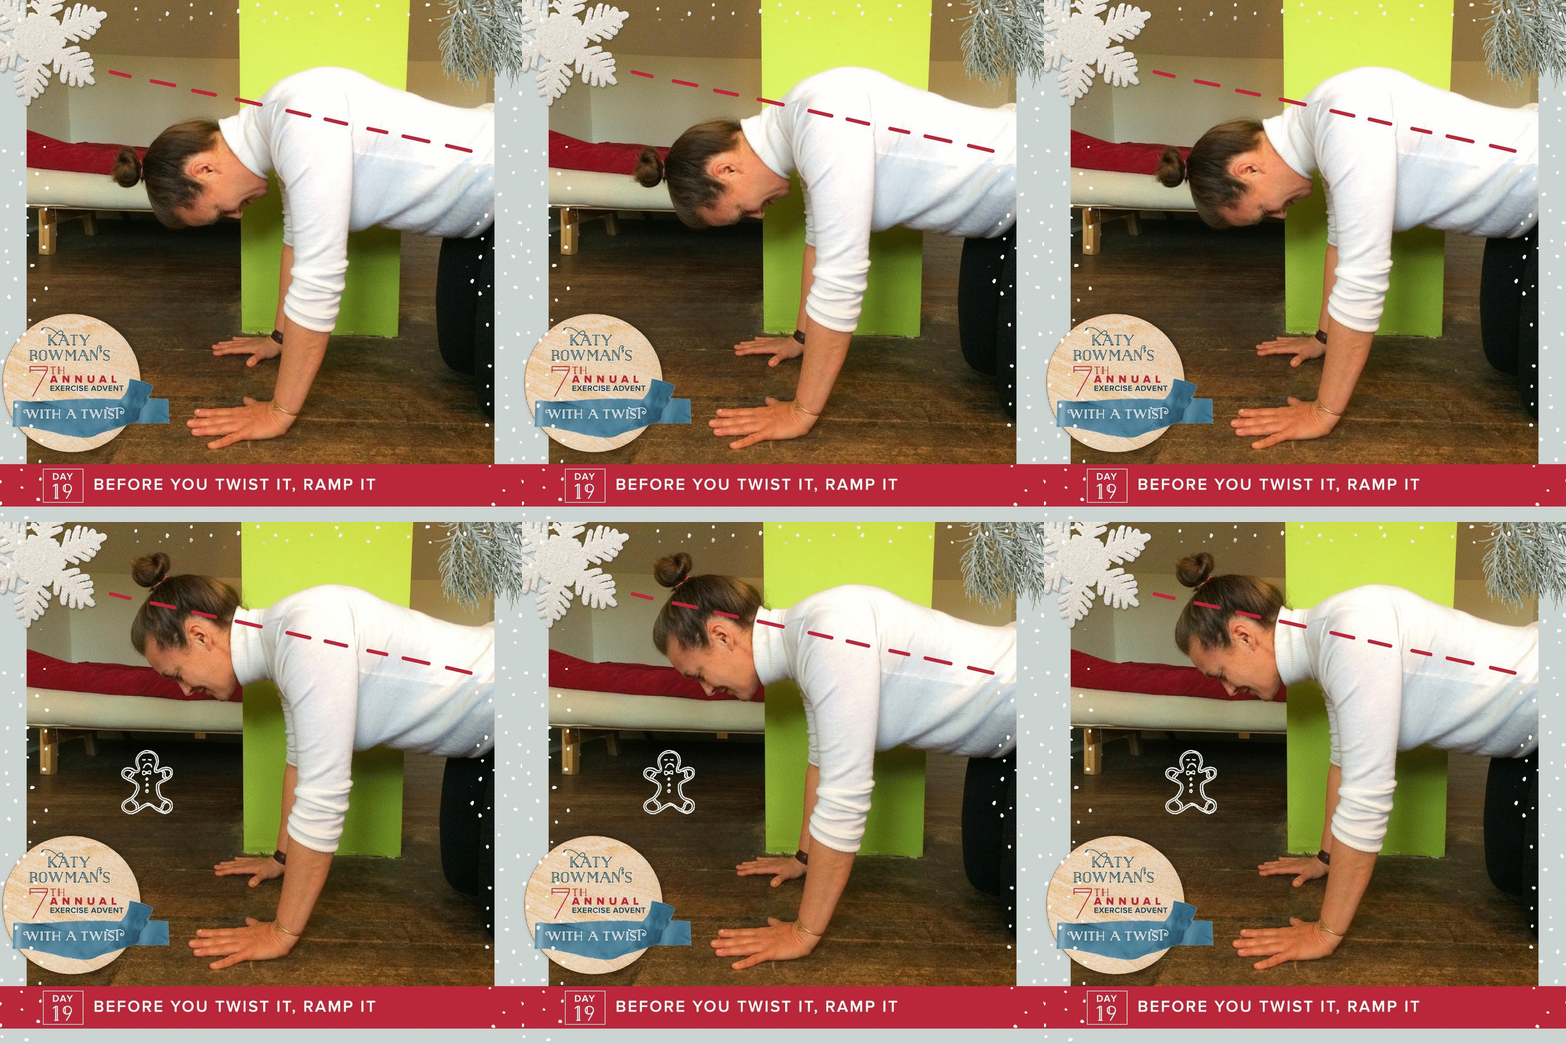
The HEAD RAMP is another #NutritiousMovement classic. To offset the “tech neck” forward and down head position, slide the head up toward the ceiling while keeping the ribcage down. This automatically moves your head back at the same time. (Watch a video on Head Ramping here.)
BUT, that’s not today’s move! To make this move easier to feel (and harder to do), we’re going to do it on our hands and knees.
1. Get down on your hands and knees. Lift your head up a few times. A common way to do this is by moving the chin forward (check out the Sad Gingerbread pic). This motion does get your head up, but it also DEEPENS the curve in the neck. We need a better way to get head up which gets the curves in the upper back and neck sorted out a little better.
2. Starting with your nose pointed toward the ground, pull the back of your head up toward the ceiling while reaching the top of your head forward. This is the Head Ramp move in quadruped, which not only brings your ears in line with your shoulders but also strengthens the upper back and neck muscles.
3. Hang out there for a few breaths and then relax. Or, practice holding your head in line while you lift up one side of the ribcage and the opposite side of the pelvis!
This move is subtle and the mechanics can be a challenge to parse, but hopefully the graphic helps. Watch the ear, to see how the two movements compare.
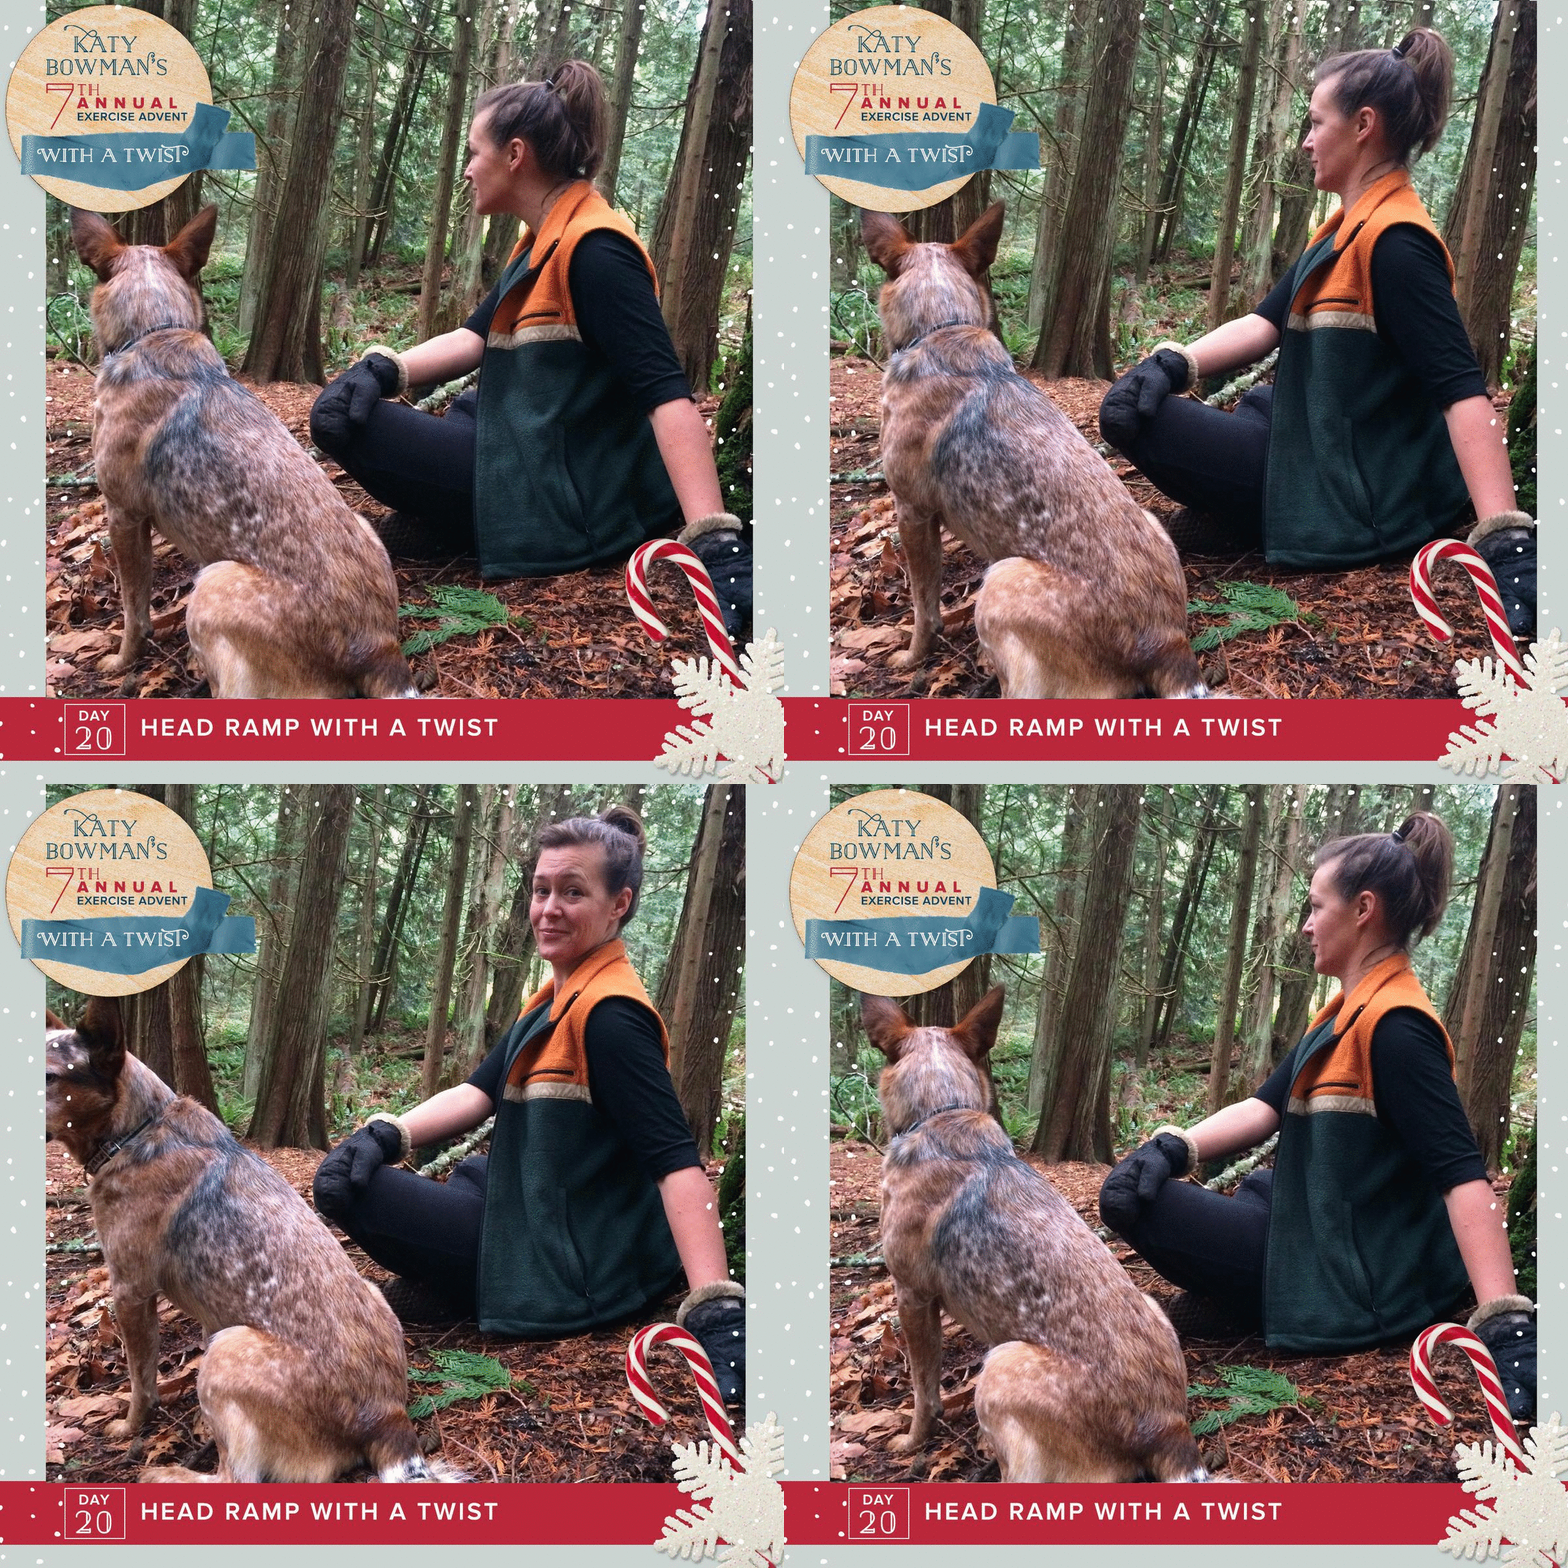
Day 20: Head Ramp...with a TWIST
Finally, we’re putting the top on our spinal twist. Don’t "help" today's twist by pulling yourself deeper with your arms. Only twist as far as your torso muscles can take you.
1. Start seated, with a neutral spine as best you can. Neutral pelvis (no slouching), rib cage centered above it.
2.Letting your arms relax on your legs (no pulling with your arms to go farther), turn the rib cage from the pelvis using your waist muscles.
3. Do a few rib twist breaths (see Day 13 on that; put your hands on your rib cage while in a twist to remind you which parts to move) and then ADD THAT HEAD RAMP by reaching for the sky.
4. Once your head is ramping (that’s a verb, so keep it active), start turning to look over your shoulder as you can, no forcing. This is likely not a new movement to you with the exception of keeping that UPWARD HEAD MOVEMENT the entire time.
From now on, RAMP IT, THEN TWIST IT. YOU GOT IT? Want us to remind you? Get some “head ramp” decals and add a little more movement to your screen time.
Repeat on the other side, and then every day for the rest of your life.
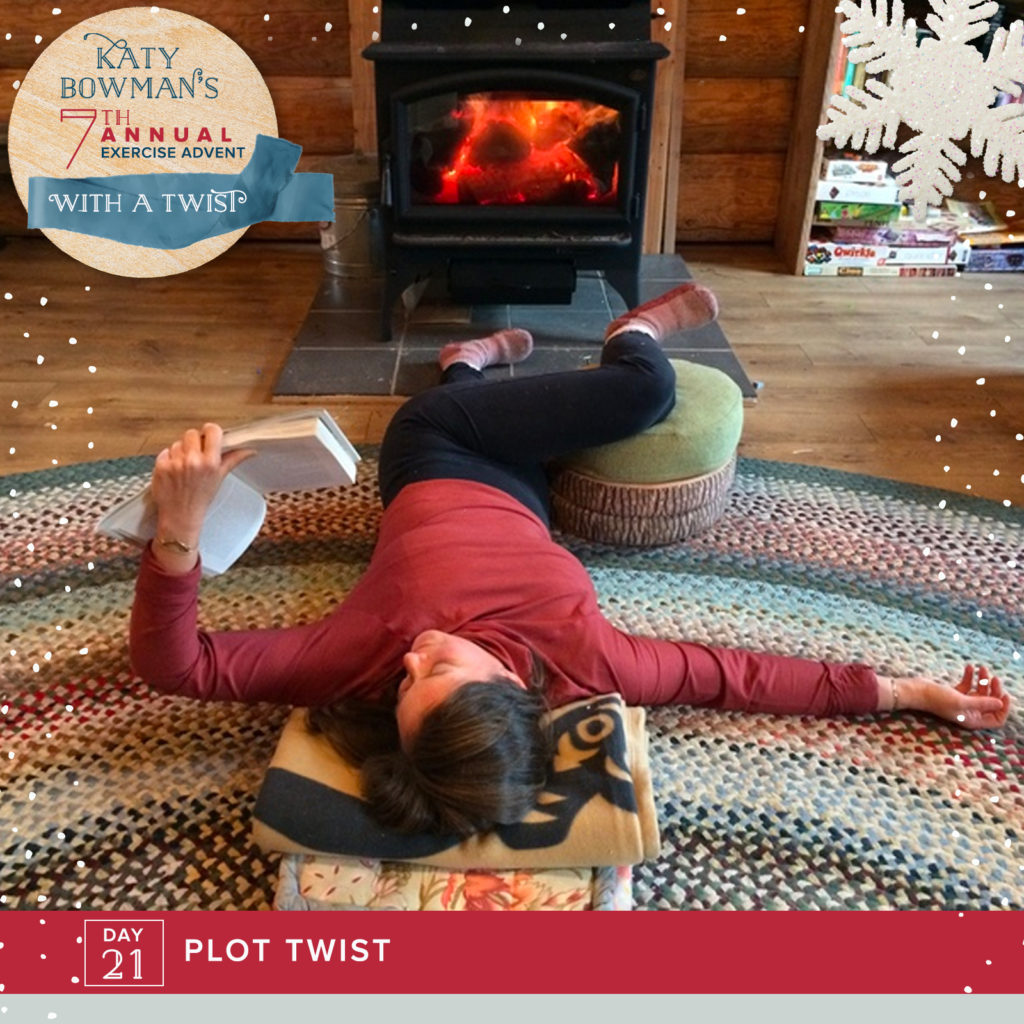
Exercise Advent, Day 21: PLOT TWIST
Who thought they’d be doing 24 days of spinal twists? Well today’s the day you get to do one. And BONUS: This move pairs well with a good book.
This twist is all about the bolstering, especially the bolstering for sticky necks, shoulders, and backs.
1.Grab a couple pillows and/or blankets for bolstering your upper body and your knee.
2. Lie down on the floor with enough bolstering under your head and shoulders to let your lower ribs come down to the floor (have a stack of pillows off to one side for your knee). You might not need any bolstering, but if you find spinal twists uncomfortable, you just might!
3. Scoot your pelvis slightly over to the right and then bring your right knee up over your right hip.
4. Roll your pelvis over to the left as far as it can go without bringing your shoulders from the floor. At that point, let your right knee rest on the stack of pillows and relax there for a bit. You brought a book right?
Repeat on the other side!
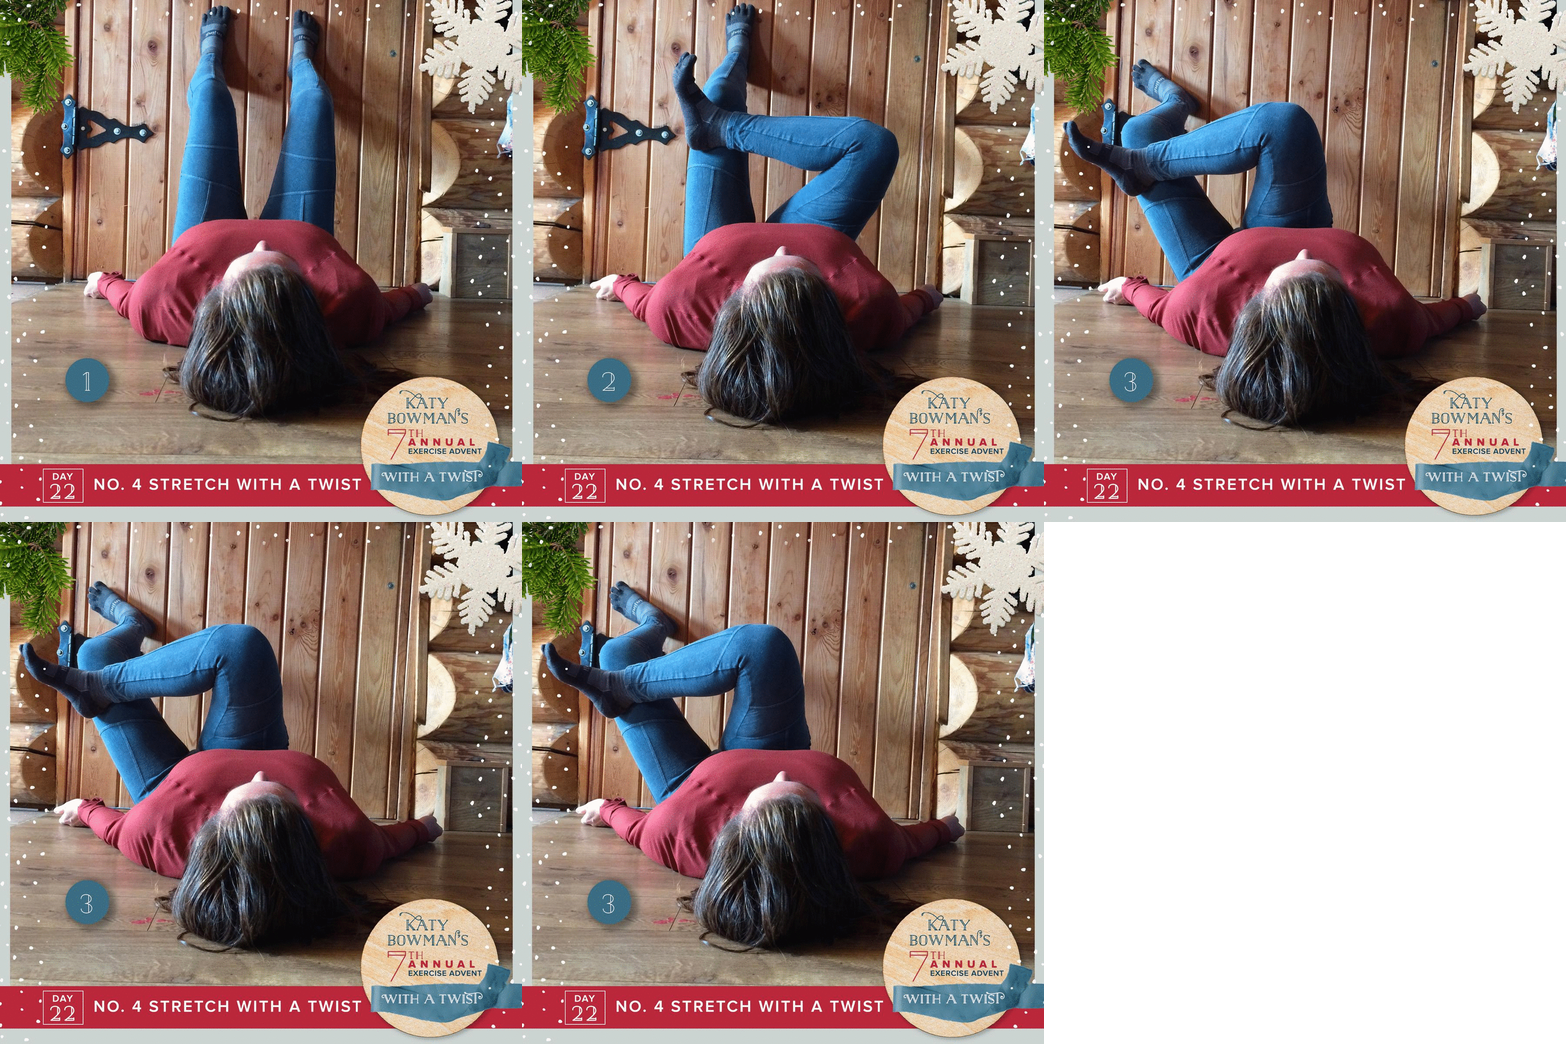
 Day 22: NO. 4 Stretch With a Twist
YET ANOTHER twist on a classic. We use a variety of “Number Four” stretches: seated, standing, and on the wall. Feel free to adapt this to your needs.
1. Lie on the floor with your knees bent and the soles of your feet against a wall.
2. Cross your right ankle over your left knee. If you can’t get the leg over or the pelvis has to tip a lot toward your head (posterior tilt), scoot back until you can get the leg across the knee and relax your pelvis on the floor.
3. Walk your left foot over and down a bit, and rotate your pelvis to align with your foot, keeping the upper body as it was.
4. Hang out there for a bit (wait, GET YOUR BOOK!), and then repeat on the other side.
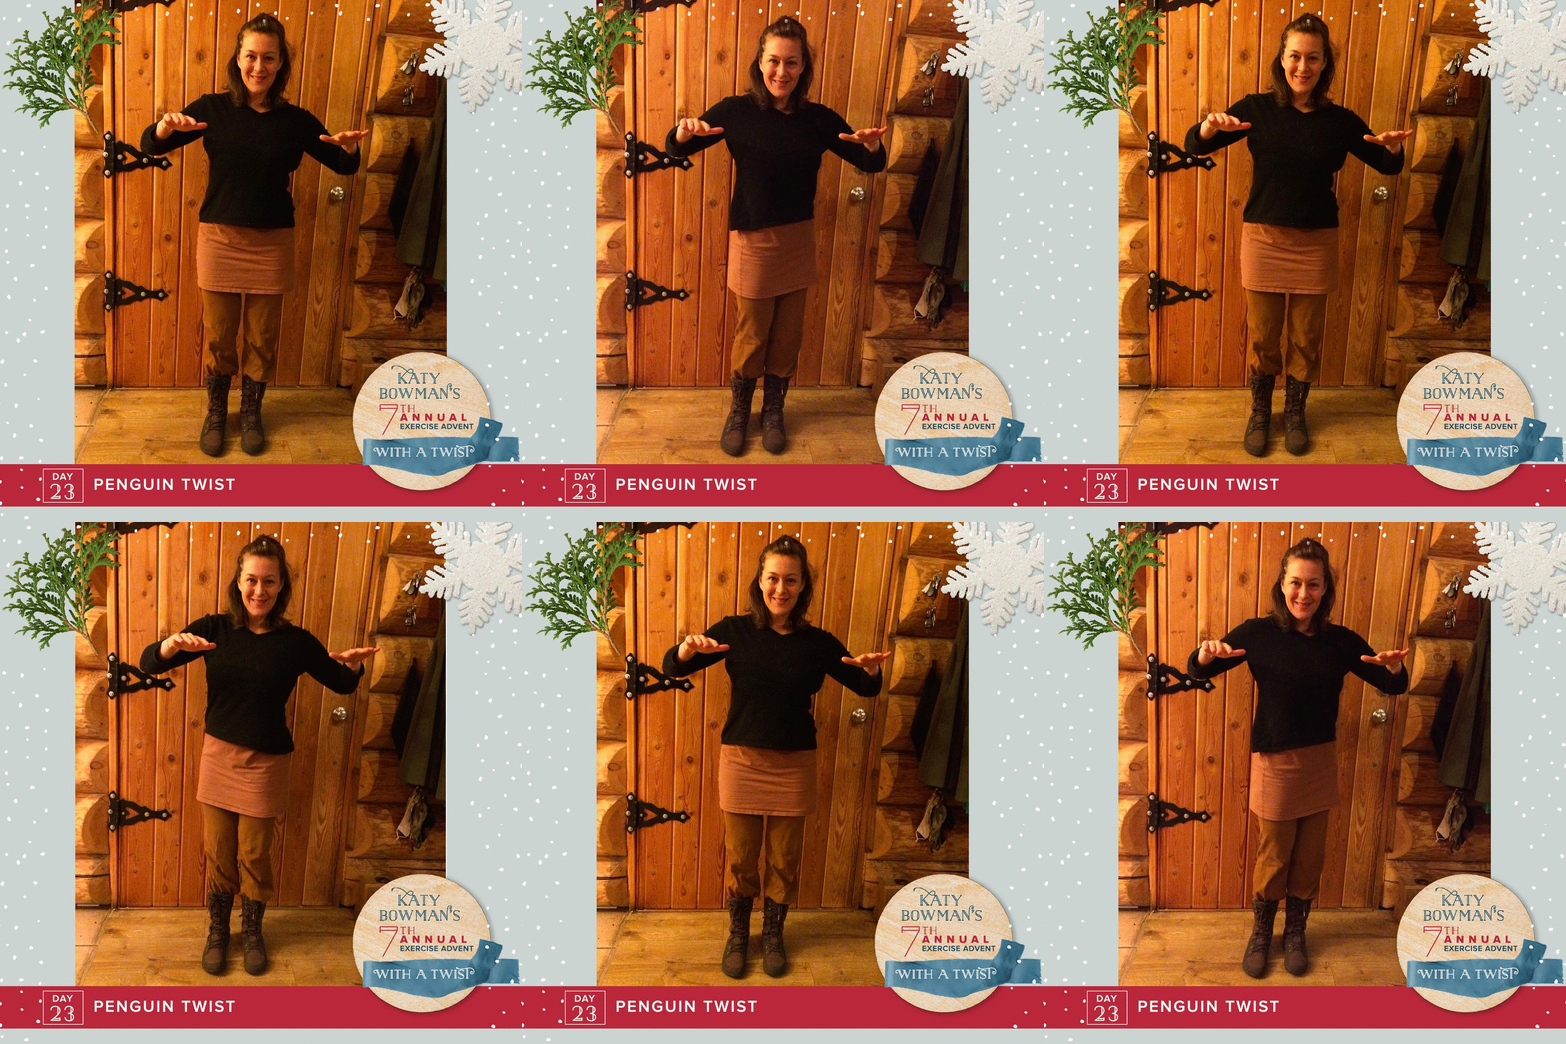
Day 23: The Penguin Twist
Here’s a whole body twist you can unwind with! Why the penguin? You’re going to keep your legs straight and your feet closer together as you twist.
1. Stand with your feet slightly closer than pelvis width with your legs straight (and try to keep your legs straight for this whole move).
2. Hold your arms up to keep your upper body still as you rotate your pelvis to the left and to the right.
Doing this in front of a mirror can help you see if your pelvis is rotating (a transverse plane motion) or if it’s wobbling or wiggling. These are signs of a sticky torso!
3. Once you’ve figured out how to stabilize your upper body, twisting back and forth 20x or so will get your torso muscles going.
This move pairs well with your favorite song. If that song has the word TWIST in it, even better. Feel free to share a twist-friendly song title below! #exerciseadvent #moveyourdna #alignmentmatters #diastasisrecti
Day 24: TWIST ENDING!
You made it, friends. Throwing the final twist at you today: For a little #vitamincommunity, you show ME your favorite twist.
1. Figure out YOUR favorite way to twist.
2. Take a pic of yourself doing YOUR twist.
3. Post a pic with the tag #exerciseadvent so we can all see!
Thanks all for moving with me; I hope you found our twisting time beneficial! Many thanks to the staff that helped me with this: ZK for design, PJ and DB for the organization and MK for the tech-support. LET’S HEAR IT FOR THE GIFS, YO. Raise your hand if this exercise advent was your favorite?
 Exercise Advent, Day 4: Shank Twist